Updated May 2026
Let’s utilise some of this packaging foam and upcycle it into a fun project for your kids, into a Snowman family, with this Styrofoam snowman craft!
White crumbly stuff, makes a great Snowman!
What can you do with all the polystyrene packaging with your newly bought tech?
What kind of surplus foam do you get left with once you have unpacked your goods?
Let’s rewind and take a look at what all this white foamy stuff is used for!
WHAT’S IT USED FOR?
You may ask, ‘Why do they use this type of packaging?’
It’s because of the composition of polystyrene or styrofoam, a type of packaging that provides a good substance designed to surround, cover, protect, and insulate a valuable item when being delivered from any damage.
This could be from a smart TV, or a sound system, to kitchenware like a cooker, fridge freezer, washing machine to kettle, or cookware!
Before we move on, let’s take a look at how polystyrene, or styrofoam, is made, leading to the end product.
HOW DO YOU DISPOSE OF IT?
So how do we dispose of it? It’s not an easy substance to recycle, as it will not break down well.
Instead, it will shatter and litter the land and our waters, but now there is a solution.
Here is a short video showing how polystyrene is used and how we can recycle it.
WHAT CAN YOU DO WITH IT?
As I try to encourage you to recycle as many throw-outs as possible in some way or another, this type of packaging can only be disposed of with ordinary household rubbish.
WHAT CAN WE DO?
Once you have received your package goods and unpacked them, you are left with rather a lot of cardboard and a huge amount of polystyrene!
The question is, how do we dispose of this unwanted polystyrene?
OFFER A SEPARATE SITE FOR POLYSTYRENE!
A better solution is to provide a polystyrene recycling facility, where the public can deposit their unwanted polystyrene.
There it can be recycled correctly without having to bin it!
WHY DON’T WE MAKE SOMETHING WITH IT?
So, having looked at this material, it’s white, lightweight, and can be shaped.
As we are approaching our winter months with looming snow possibly ahead of us, what comes to mind?
MY INTENTION!
I do have an idea how we can utilise at least some of it into a fun kids’ activity.
I am going to carve a Snowman, a Snowwoman, and their child. And that’s right, we are looking at a Snowman and his family!
Just like this picture of a Snowmans family, we will have a go, and make our Snowman family with polystyrene!
WHAT IS SNOW?
So, what is snow? It’s seen as a crispy, white, fluffy material that falls to the ground from the sky in speckles. ❄ ❄
❄ ❄
When it lands, it slowly layers up like a white magical blanket that almost covers all that is recognisable, yet it brightens up the road ahead! ❄
In more detail, snow is formed when tiny crystals in the clouds stick together, then they become heavy and fall to the ground! ❄
WHY DOES SNOW CRUNCH? ❄
Furthermore, snow does make a sound, so when you walk on it, it makes a crunch-like sound when you compress it with your foot.
So as the snow gets compressed, the ice grains rub against each other, and the colder it is, the louder the noise or crunch will be!
Let’s get back to the project in-hand! Our Styrofoam Snowman craft!
HOW DO YOU WORK WITH STYROFOAM?
I tried numerous ways to cut and mould this resource (and it may be best for an adult to do this part).
The tools I used were a serrated knife, a scalpel, and or an electric knife, so that’s why only adults should assist any child with the handling of sharp cutting tools.
VERY MESSY!
Furthermore, I found the serrated knife the easiest to work with, and it gave a rather nice texture to the Snowman, which gives that snow-like feel.
In comparison, it resembled real snow, but it’s very messy, and chipping and cutting through this material just creates a carpet of white beads!
RESOLVING THIS MESS!
Moreover, having searched around for an instrument that can cut easily through polystyrene without creating a mess, I discovered a hot wire cutter that slices through this material as easily as butter!
THICK OR THIN?
I surmised that a solid, thicker section of polystyrene would work best, as you can cut sections out and mould them into shape, rather than a thinner section that may snap if you apply too much pressure.
WHATS FIRST?
Firstly, once you establish a good chunk of foam, use a pen and draw onto it the shape of a Snowman, a head, and a large, round body.
If that is hard to do, then I suggest you mould sections, for example, a larger ball-like shape representing the snowman’s body, and a smaller round shape for the head.
Then you can attach them, using a cocktail stick. (This will be shown later on.)
AND THE FINISHING TOUCHES?
The final touches will be the eyes, nose, mouth, buttons, arms, hat, and scarf.
All these items I found from my art stock and held onto recycled packaging papers.
The whole project took just over one hour to make.
So let’s see what we can use:-
GATHER THESE RESOURCES AND LET’S GET GOING!
Resources:
- 3 Chunks of polystyrene.
- Serrated knife/scissors.
- Hot wire cutter. (not shown)/Pins.
- Recycled packaging paper. (hat & scarf)
- 6 Black small buttons. (eyes)
- Some cocktail sticks.
- PVA glue/hot wax/Sellotape.
- Orange/black felt-tip pens.
- 6 Small twigs. (for arms)
- Black tissue paper. (for buttons).
Hot wire cutter is available from: eBay, Amazon and good craft suppliers.
ARE YOU READY?


Here’s a reminder of what you can make.
Cute, aren’t they, and the results can be quite effective, despite the nature of this material.
Once you have got the knack of carving out shapes, you are good to go, hence you can craft a lot more fun things, some of which I mention below!
HOW TO DISPLAY.
When you have finished sculpturing your Snowman family, you can display them inside your home by the Christmas tree, or even outside your home.
Instead of dressing them up with packaging paper, you can make the hats and scarves out of fabric, as they would weather better.
SOME MORE FOAM IDEAS!
Here are a few more suggestions!
- A PHONE STAND with a rectangular shape, make sure the foam sits flat and cut out a step, like a shelf with a back piece, hence allowing for you to rest your smartphone on it, comfortably.
- A PENCIL HOLDER. Cut a 3d square shape, then make holes on top, then pop in your pencils. It will look like a spikey pencil holder.
- A DOOR STOPPER. Cut the foam like a wedge so you can slide under the door, hence keeping the door open, or stopping the door from shutting.
- TABLE CORNER PROTECTORS. Stop your toddler from knocking their head on the corners of your coffee table! It may not look that great, but it’s an instant go-to for protection.
- Quickly tape small blocks to each corner of your coffee or dining table, and voila, it helps protect their little heads!
- SMALL BATH BOATS. Because of the composition of polystyrene, it repels water, so how about carving out some bath boats for your toddler to sail in the bath w
FOOD FOR THOUGHT!
As I have now experienced working with foam, I may, in due course, have a go at experimenting a bit more and see what else I can produce.
As a result, by using the same tools, and if I am successful, I will provide feedback with more craft ideas. So watch this space!
SOME USEFUL TIPS!
WARNING!
- First of all, this type of craft, especially the cutting, should be done by an adult, as you are using a serrated knife and need to be very careful.
- If you use a hot wire cutter, the same applies, as the wire will get very hot.
LAY PAPER!
- When you start working with foam, protect the area with any kind of paper, newspaper, etc as there will be lots of particles that will go everywhere. At least this way, you can collect and dispose of them easily.
VENTILATE!
- Open doors or windows for ventilation and wear a face cover to not inhale fumes.
- Even if you are going to use the hot wire cutter for a short time, ventilate where possible.
USE TOOLS CAREFULLY!
- Be careful in how you cut the foam, especially with the serrated knife.
- Use a saw-like motion, and follow your drawing.
- If you accidentally cut chunks of foam out, you can re-use odd bits of foam and slot them in the holes.
- Apply PVA glue, and secure it with cocktail sticks.
NOSES!
- Find small pieces and shape them into carrot-like noses.
- Paint them with orange acrylic paint.
- To help with this, use cocktail sticks to hold noses in place, so you can paint them.
ADD-ONS!
- Stick on black buttons for the eyes, and use appropriate sizes that go with the head size.
TISSUE PAPER.
- Roll up small pieces of tissue paper into balls for the mouth and body buttons, and glue on with PVA glue or hot wax.
PVA GLUE.
- You may need to lay snowmen down to stop glued bits from sliding down, as PVA glue is wet and needs time to set.
DRESSING THEM UP!
- Cut long strips of packaging paper to make scarves, hats, and belts, and colour how you like.
HATS.
- To make the hats, cut rectangles and play around with them until you achieve a suitable style.
PINS AND SELLOTAPE.
- Use pins to secure hats and scarves.
- If papers tear, simply stick them together with sellotape.
DIFFERENTIATE!
- I made mummy boobs and stuck them on with hot wax, also giving her curves, although you can do your version.
HUNT FOR TWIGS.
- Go hunting in your gardens or park and find little twigs for arms and push them in on either side of each snowman.
I thought to include this short video, as it has a lovely Christmas message, and it looks a lot like our Snowman, too!
LOOKING FOR SOME SNOWY CRAFT FUN THIS CHRISTMAS?
If your children enjoy getting creative during the festive season, then snowman craft kits can be a wonderfully fun activity to help keep little hands busy over the Christmas holidays.
From soft pom-pom snowmen and felt decorations to colouring activities and build-your-own snowman crafts, there are plenty of imaginative ideas available on Etsy to suit different ages and interests.
Many snowman kits also come with ready-prepared pieces, making them ideal for cosy winter afternoons, classroom activities, party crafts, or homemade Christmas gifts.
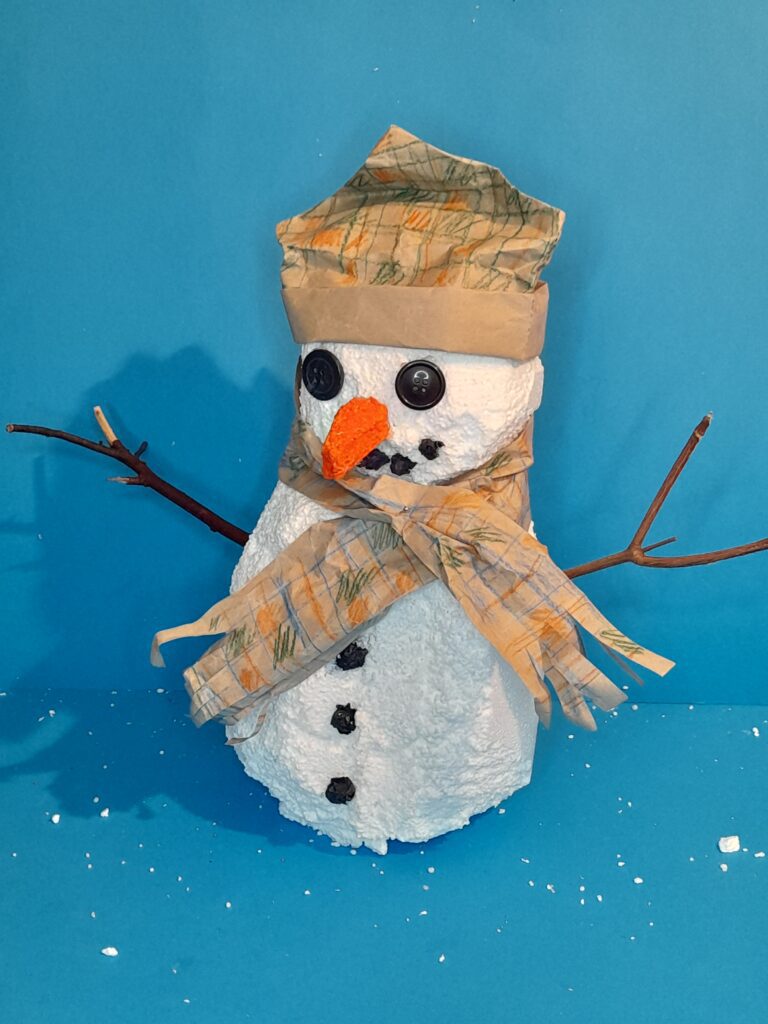
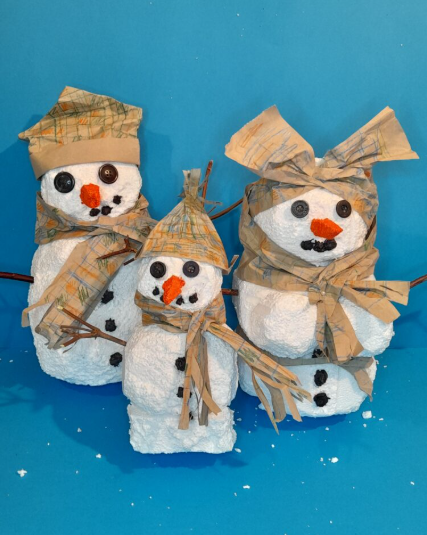
Children can enjoy decorating their snowmen with scarves, buttons, hats, glitter, and colourful accessories, while adding their own creative touches along the way.
So are you after festive inspiration? Why not explore some of the fun snowman craft kits and activities available on Etsy?
Whether your child enjoys sticking, colouring, painting, or creating playful winter characters, these snowy-themed activities can add a little extra magic and creativity to the Christmas season.
When you click links in this post and make a purchase, I may earn a small commission at no extra cost to you. This helps support the craft projects shared on this website.😀
(Affiliate disclosure)
TO CONCLUDE!
In this post, I show you how you can utilise some of your recycling, that being polystyrene that comes in your large tech packaging, and create three friendly snowmen, hence our snowman family!
REASONS!
This type of foam, for me, resembles snow, especially when it starts to flake away, hence the idea of a snowman.
We would be upcycling foam into a fun Snowman family project for your kids to do!
WHAT YOU HAVE AND WHAT YOU NEED!
You only need a few more resources, some twigs, paint, and packaging paper, some glue, a choice of cutting tools, and you are good to go!
LOOKING AHEAD!
So whether we get a tremendous amount of snow this winter or not, you can still have fun crafting our Styrofoam Snowman family!
So don’t forget to save some of the polystyrene, and put it to good use, having fun with your kids at crafting this Snowman family, pretending it’s made from real snow!
Final note, I would love to see what your kids craft, and their take on a Snowman family, and I can update this post with pics of their work!
Hey,
My niece and nephew are coming to visit me today for new year’s eve, and I am going to share this article with them.
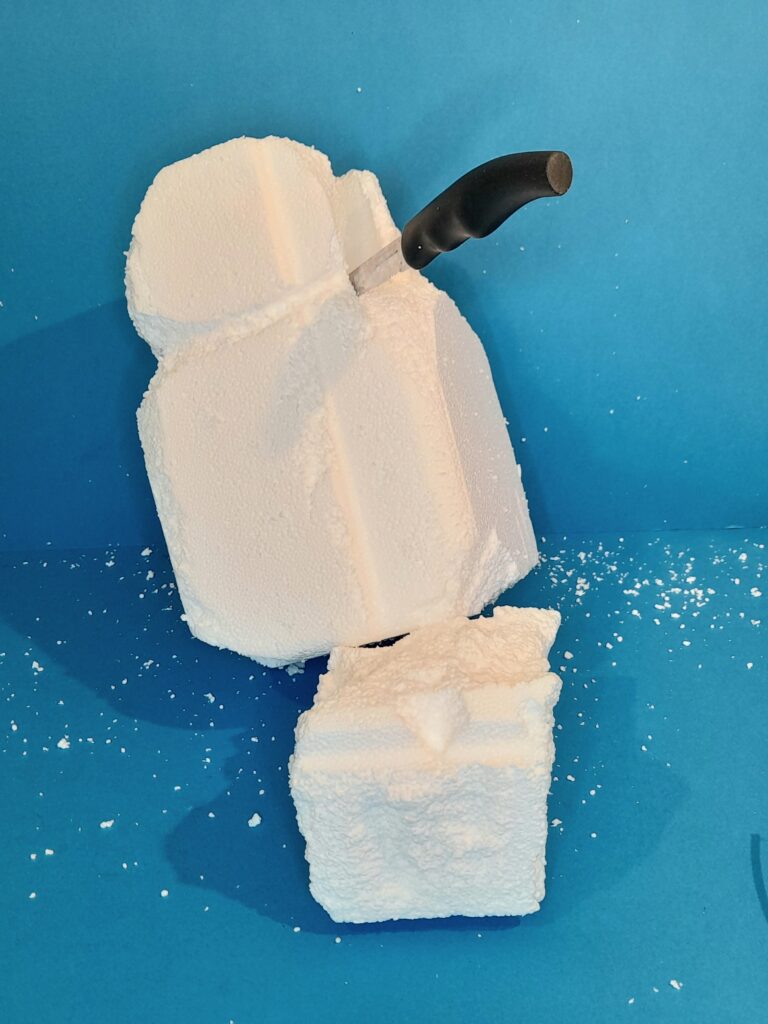
It will be great to use the foam from their toys and also the foam the recycle paper that I have left over to make snowmen with them. It will be such fun for them and for me.
I will let you know how we go, and the look on their faces when I share this article with them.
Thank you for sharing and keep up the amazing work.
All the best,
Tom
Hey Tom, glad you like this project! Before you start have a practice and see what works and the direction you aim to go with, but if you have enough chunks of foam, then practice makes perfect! checkout the tools you use especially with the kids!
Heads-up, it is messy, but that’s part of the fun, so be prepared for that! Otherwise, it is a great activity for you and your niece and nephew to get down and start creating!
Thanks for your super comment, and Have a Happy New year!?
Julia?