Prize your eyes on this video.
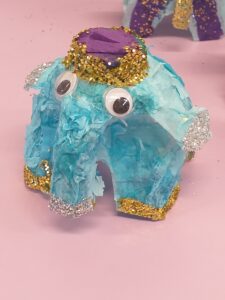
The creation of our friend the elephant.
Hey as promised I made a video on how to make an elephant out of a plastic milk bottle from your recycled throw outs. You may ask, why an elephant? well you just have to look at the milk bottle, it’s calling out to you ‘don’t I look like an elephant?’ Yes it is a bit fiddly to make, so you may need an adult to help.
Watch out for the scissors and of course the hot glue gun. In all it could take up to 20 minutes. When I was making the video, I put it in a fast mode to speed things up! It took me just over 17 minutes to make, but just over 5 minutes to show how it’s made. The wonders of filming 🙂

I’m hoping it would take your mind of things for the minute and loose yourself in this mini production of a milk bottle elephant, made from recycled throw outs! Have a look at the resources, listed below I will talk you through this and some tips, which might come in handy.
Oh at the end of the video, I sing a nursery rhyme, ‘Elephants have wrinkles’, have you heard it before? It’s part of the song, I thought it could liven things up and make your activity more fun! Give it a go. 🙂
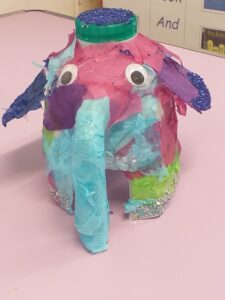
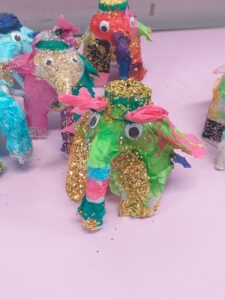
Below are some other examples of these little elephants, that the children in my Art club made. They used coloured tissue paper and glitter instead.

Gather your resources
- 1 large Plastic empty clean milk bottle (over 2 litres plus, or any size.)
- Acrylic paints, White, Pink, Blue, (shades you like)
- Embellishments, Sequins, Glitter, Feathers, or gem stones.
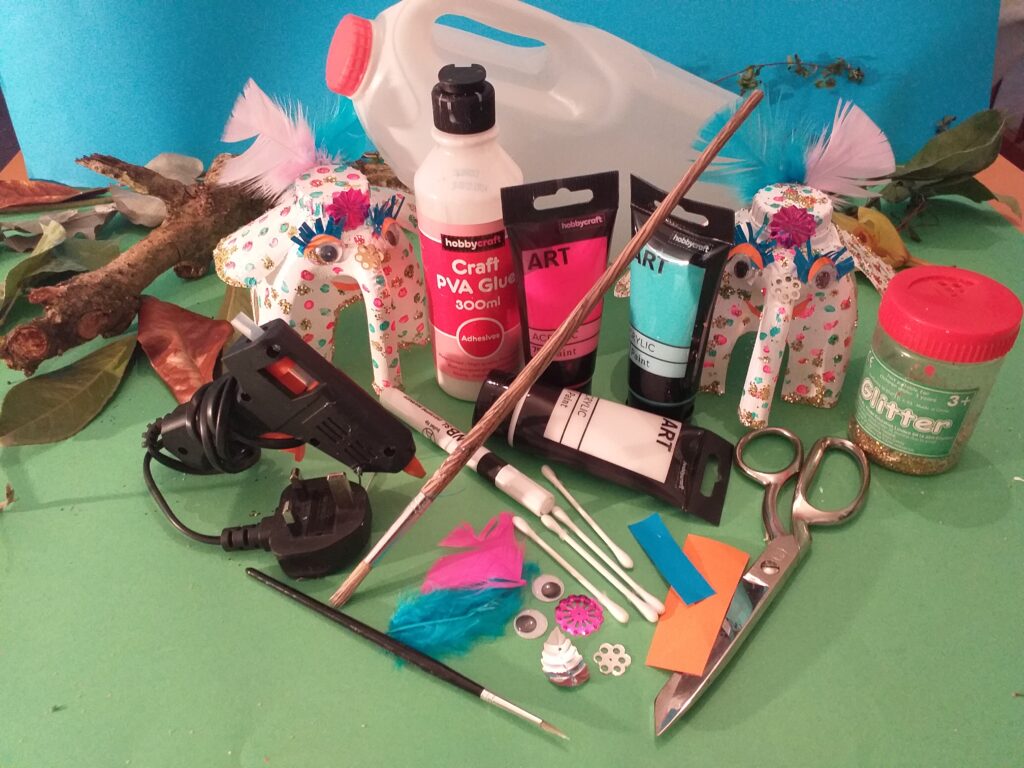 Googley eyes, the size you like.
- Glue gun, PVA glue, a few cotton wool buds, to do dots with.
- Scissors, brushes (large/small)
- Coloured papers (for eyelashes/eye-lids/mouth) a colour you prefer.
For Art stock check out :- www.hobbycraft.co.uk
WHAT SIZE BOTTLE SHOULD I USE?
Decide on the size bottle you would like to use. It really depends what you have, check out all your plastic bottle throw outs even the smaller plastic milk bottles are fine, it can be a baby elephant! As long as it has a handle like the one shown in the video, as that’s the nose.
WASH IT THOROUGHLY AND MARKING IT.
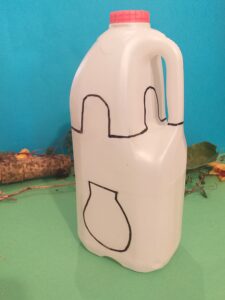
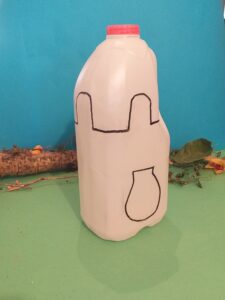
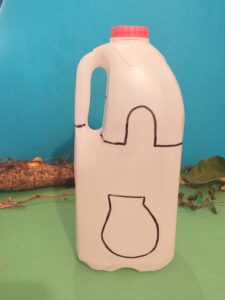
Clean it out really well, with some washing up liquid, until it smells clean. Leave the bottle upside down to drip dry. Wipe around the bottle as well. When it’s all dry, draw with your black felt tip pen, from the base of the handle as a guide line all the way round the bottle. (see below pics for example).
If you make a mistake with the line, it can be rubbed out and start again. I had to do the line many times to get it right and keeping it level all the way round.
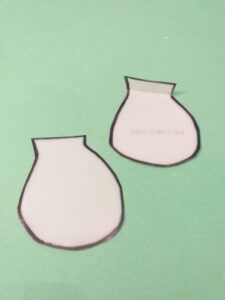
On the bottom part of the plastic bottle draw the ears as large or as small as you want. They should be round and oval shape and at one end with a flap, so as to fold and stick on either side of the head with hot glue. (They should measure approx. 75mm x 60mm).
HOW IT SHOULD LOOK.
In the video, I don’t show the drawing part of the elephant, because it is time consuming, I just show the line already drawn on the bottle. Below are some still images of different angles showing you how it should look, once the line is drawn on the plastic bottle.

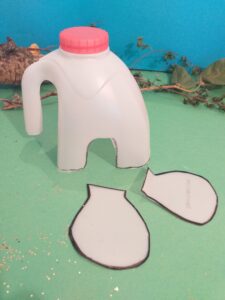
CUTTING IT OUT!
Use a good sized scissors, a larger one might cut better, it needs to pierce and cut into the plastic easily (an adult can help.) Take away all the unnecessary plastic.
HOW TO GLUE AND PAINT!
Get your hot glue ready (this is heated up wax) and stick on the ears and googley eyes, hold in place, remember the glue is hot, but before it sets, it’s still pliable so you can move the ears around so they are equal to each other (adult should do this part, especially if the glue is still hot) .
No hot glue gun, then you can cut a slit on either side of the elephants head and slide ears in, tape on the inside to hold. You can use PVA glue instead of hot wax to glue on googley eyes. Hope that helps.
Then apply the white acrylic paint all around the elephant. You may need 2 rounds of paint. Allow to dry. With the cotton buds apply the coloured paints. Do one colour first, then the second colour.
PVA GLUE AND GLITTER.
Now carefully dot the PVA glue all around the elephant, emphasise the edge of the ears, around the feet, end of trunk with a thin line of PVA glue. Grab yourself paper or card fold in half and sprinkle the glitter all over the elephant catching it in the folded paper. Then pour the glitter back into the glitter pot. At this point you can allow to dry or continue.
HOW TO EMBELLISH IT!
Whilst the glue gun is on you can apply the feathers at the back of the head, the sequin for the tail and over the nose and forehead. To finish off your elephant, take the coloured paper of your choice, cut out the eyelashes and the eye-lids and mouth. (These can be prepared before you start to make it easier.) Now you can use PVA glue to stick these on and secure, by pressing and holding in place until they stay in place.
SOME TIPS!
Whilst making the mini elephant, in each section I have tried to include as many tips that I can think of, based on what I experienced. So follow through and you will be just fine. Also I have deliberately high lighted some words in bold, these are keywords that you should take note of within that section.
That’s it. There you have it your colourful mini elephant. If you don’t want to paint dots, you can do stripes instead, though you need a steady hand. Allow some time ahead of you to do this activity. Prepare all your resources as I have shown you above and don’t rush it, enjoy and have fun, because the end product is eye catching.
TO CONCLUDE
No matter how many times I do this project, it’s always a surprise to see how different each child’s version is. Once you have all your resources together you just leave them to their own devices.
It astounds them to see how you can convert a simple item, as an empty plastic milk bottle, into an amazing little elephant! I am sure you will get a similar reaction with your child.
who would believe that you would be using your throw outs and recycling and transforming typical looking junk, into something super cool!
So happy crafting!!!
Click to return to ‘Milk bottle Whale’ milk bottle whale
Return to ‘Milk bottle Dinosaur’ milk bottle dinosaur
Return to ‘Summer fun crafts for kids’ return to summer crafts for kids!
Hi that’s great! I loved ? it! What a fun activity for kids. Great video too! What do you do with the extra plastic? Do you make anything else out if it? I know what you can do! ?? You could do part 2 for older kids and make a tail for the elephant and the other part could be finding a way to use up all the plastic so it’s not thrown out. Maybe add plastic texture pieces glued to its body. I absolutely love elephants ? Thanks for sharing. ??
Hi Lili, thanks for a super comment, glad you liked the video too. When we have made these elephants before, we do make a tail out of the plastic, on this occasion I use the sequins for decoration instead. As for the left over plastic that’s a brilliant idea, yeah it can be used to decorate the elephant even more! and the older kids could do that part. I should include this in the post. I got caught up more in decorating the elephant and giving it a nice finish, I completely forgot about the rest of the plastic, but now I can see what you mean, I may try your suggestion for the next time. Appreciate your input and thanks a bunch!:-) O’h before I forget, I have made another 2 videos on making ‘Incy Wincy Spider’ and ‘Bigsy Wincy Spider’ You should check those out too! Love to hear what you think.