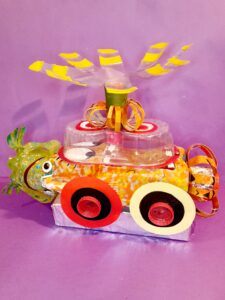
Wait! Before you throw away your broken crafts, you can up-cycle parts and make something new, like a fun futuristic truck craft for kids!
Use Old Projects, to make Truck craft for kids!
So here we are, as promised in the previous post, ‘Recycling Art Projects!’ I mentioned that I will attempt to make something out of old craft projects!
In this post, I will show you that it’s not impossible to use plastic again, using elements from old projects, and upcycling them into a ‘Truck Craft for Kids!
PUSH, TWIST, AND ADD!
With all the different shapes and materials, I managed to join them together, and some parts can rotate and spin around, too!
RECONSIDER!
If you and your kids like crafting, but sometimes projects can fall apart or get damaged over time, do reconsider instead of chucking them out.
HAVE ANOTHER GO!
Challenge your kids, and yourself, and look later at what I made. The final results may look a bit odd, but it will be fun trying to work it out and make something you haven’t made before, but with a difference!
MY INTENTIONS!
I wanted to show that you can use your recycling again and again, as many brands now are using recycled plastics to make greener toys.
MY PARALELL.
So along the same lines, I re-present my interpretation of going green, by re-using old projects and up-cycling them. There would be less in the recycling bags!
DIFFERENT MATERIALS AND SHAPES.
This is what I had, and what I did with them.
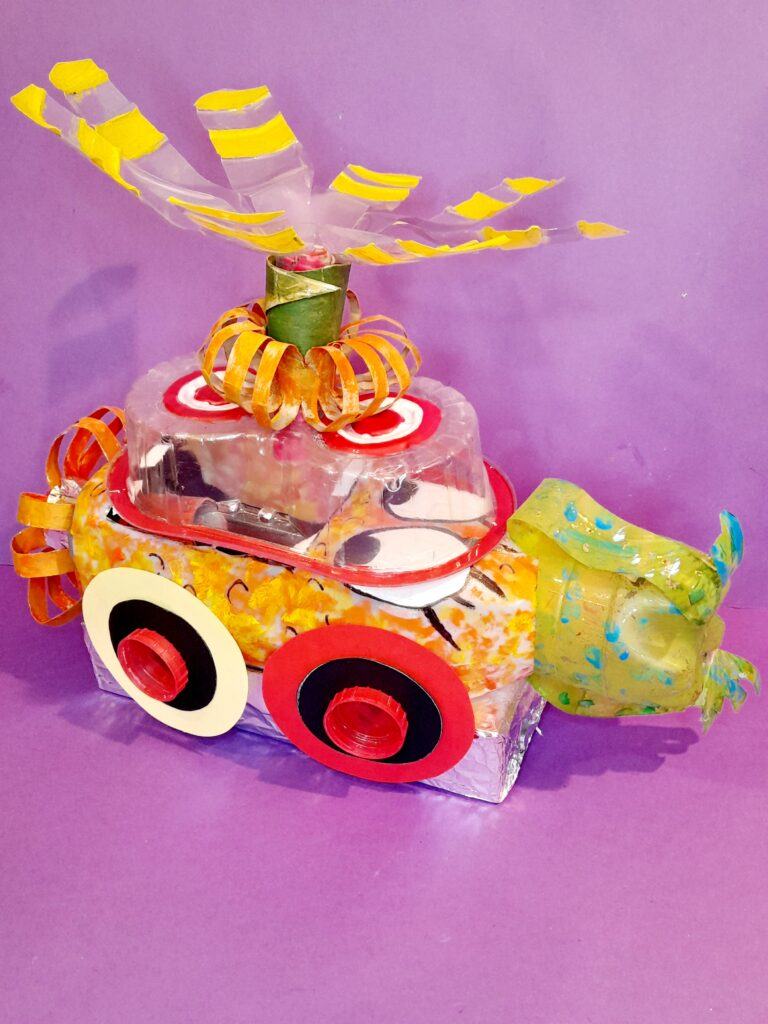
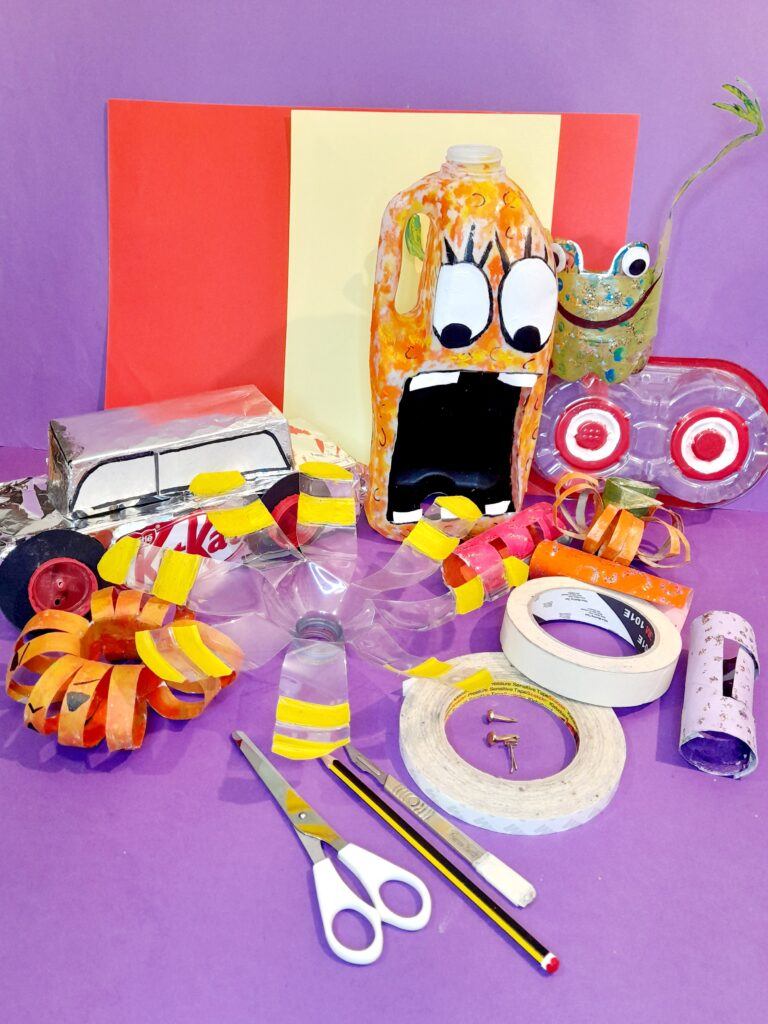
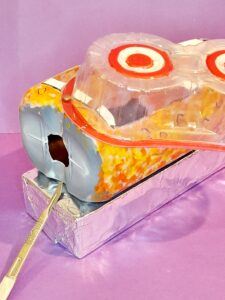
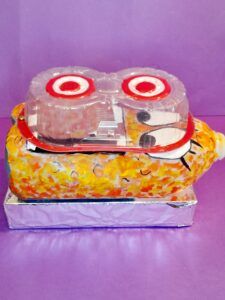
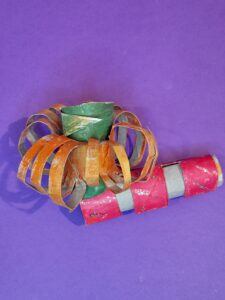
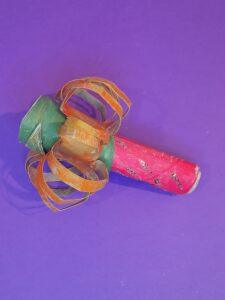
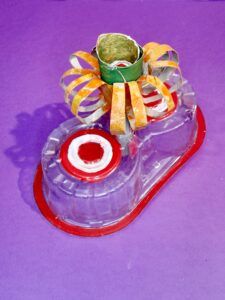
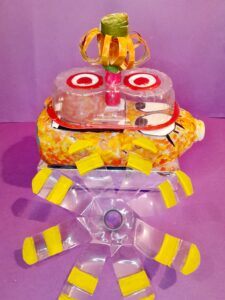
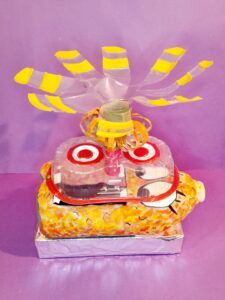
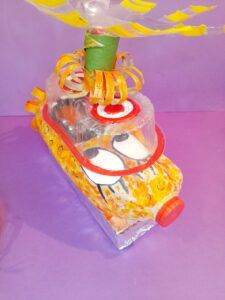
The shapes determined what to make. There was the rectangular cereal box, which was originally a Father’s Day gift box car, a plastic bottle made into a fan, some cardboard inner tubes made into pumpkins, and Valentine letters, and a milk carton monster face!
TOUCH UP AND RE-COVER!
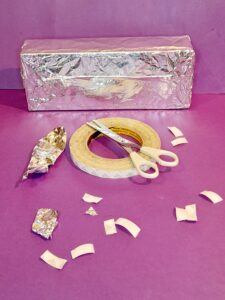
I re-covered the cereal box with new foil as it got ripped, also foil being shiny will glide easily along the floor.
TOUCH-UP PAINT.
I went over some small areas with the same coloured paint to re-vamp worn-out paint, in your case, if it’s necessary.
WHEELS TO SUIT.
I also made the wheels larger so they look like the wheels of a truck.
MOVEMENT.
I added a split pin to a plastic lid on top of the main body, attaching it to the monster’s face to allow movement, so you can then swing the lid to either side and you can put something inside the mouth of the monster.
SPINNING!
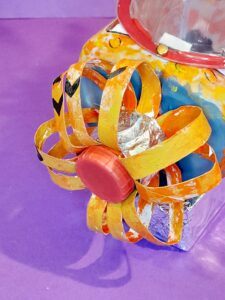
The plastic windmill can spin around as a tightly rolled inner tube is run through the middle, holding it upright and allowing movement.
Also, the small inner tube pumpkins can rotate too, by carefully moving them around.
ANY OPENINGS?
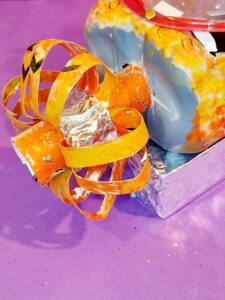
If there are bottle openings, you can keep them simple and just screw on bottle tops to give them a finished look, or, as I have done, decorate the openings by inserting inner tubes and dressing them up.
PLAY WITH SHAPES!
Before a decision was made about what to make with all the different shapes and materials, I had a little play around, moving shapes in and out on top and underneath until I was comfortable with the whole look.
SO LET’S GET STARTED!
Here is a mixture of old craft projects and some resources.
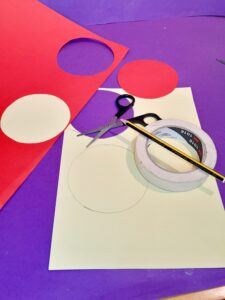
Coloured cards.
Sharp scissors.
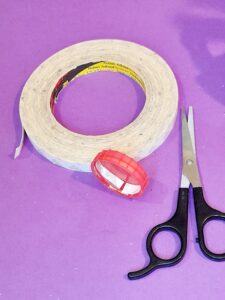
Double-sided tape.
Round large shape (masking tape)
Pencil/scalpel.
Split pins/foil
LET’S SEE WHAT I MADE!
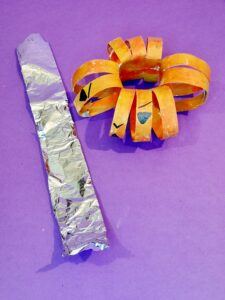
1) Re-cover cereal box in new foil.
2) Use double-sided tape to stick foil firmly.
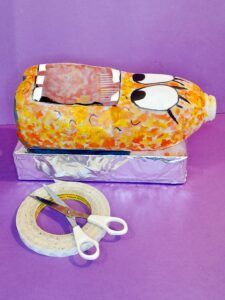
3) Stick onto the box the plastic monster carton laying down.
4) Use a split pin and make a hole into both see-through plastic lid and into the base of carton.
5) So you have 3 parts on top of each other.
6) Find inner tubes compress until tight and insert into the inner tube pumpkin.
7) There is now a long tube to insert into the plastic lid.
8) Make a hole in the middle of the lid with sharp scissors and insert the long tube inside it.
9) Get the windmill and squeeze it right on top of the pumpkin tube.
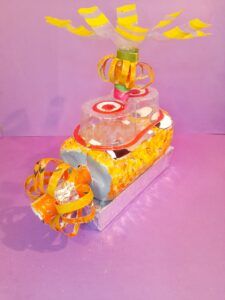
10) All parts now make the main body of the truck.
11) Wrap foil around the middle part of the pumpkin.
12) Insert into the back of monster carton face, there is a hole already there.
13) So it should look like this.
14) Cut thin strips of double-sided tape and stick inside lid to adhere it on end of pumpkin.
15) like so.
16) With the other end you can just screw on a lid to finish it off.
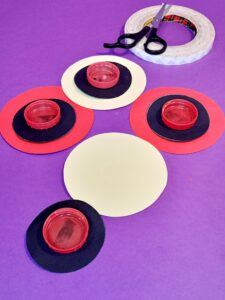
17) Now use masking tape to draw around and make big circles, cut out in 2 colours.
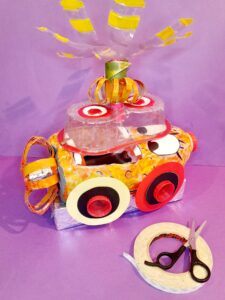
18) Stick on existing wheels, from Fathers day project onto the larger circles.
19) Then attach with double-sided tape onto the side of truck.
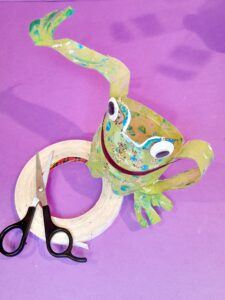
20) Grab the plastic bottle frog, the legs are extended stick them down onto its body.
21) Stick frog onto the other end with double-sided tape. This is the finished truck
And there you have it, a fun kind of futuristic truck!
I hope you got something out of this project. I show you how you can use pre-existing projects and work them together, making something completely different, like this Truck Craft for Kids!
SOME TIPS!
THIS WOULD BE TO UTILIZE OLD FOR NEW!
Touch-up-paint
If you are working with plastic, and the paint is worn off, just re-touch it with more paint to give it a lift.
To stick
Using double-sided tape would be sufficient to glue pieces together.
Access
Work out your shape with different pieces until you achieve the look you want, then stick all parts together.
More stock
If you want to add on more newer recycled parts, go ahead; it just means you are up-cycling more throw-outs in an inventive way.
Save
Every time we buy a carton of milk, I save the plastic bottle tops; they will come in handy for modelling and so forth.
Sharp tools
Use sharp scissors to help cut out small holes in the plastic, or to pierce holes to insert split pins in.
This brings me to this fabulous toy, which also puts parts together, but uniquely, take a look!
HERE IS SOMETHING THAT WORKS LIKE MAGIC, BUT WITH THE POWER OF MAGNETS!
Do you like the idea of building something that automatically attaches?
Perhaps something that is a super cool toy for kids?
Building from a net but with the power of magnets can bang itself together into an extraordinary 3-dimensional creature, building, or any fun shape; your imagination is limitless!
The Kid Collective offers a beautifully curated range of toys designed to support imaginative and meaningful play.
Their collection focuses on high-quality, educational pieces that encourage creativity, problem-solving and hands-on learning for young children.
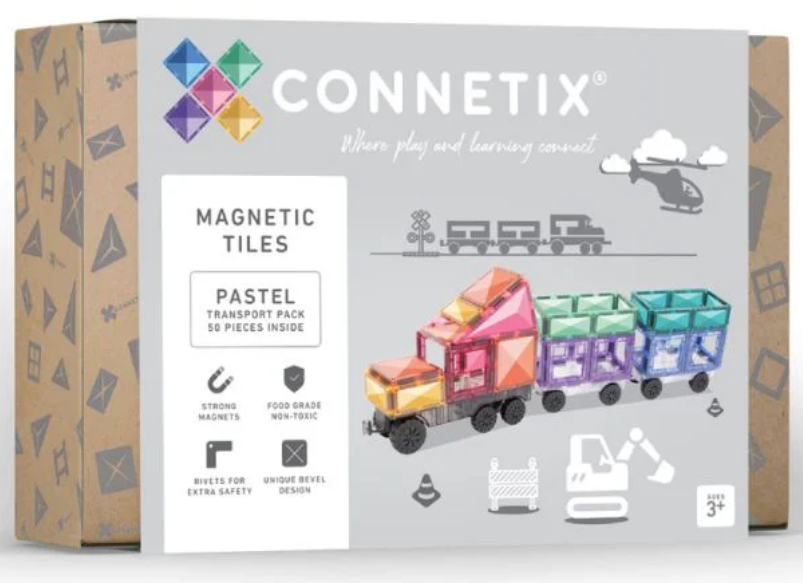
One of their standout toys is the popularConnetix magnetic tile sets—an engaging, open-ended construction toy that lets children build, explore shapes and develop important skills through play.
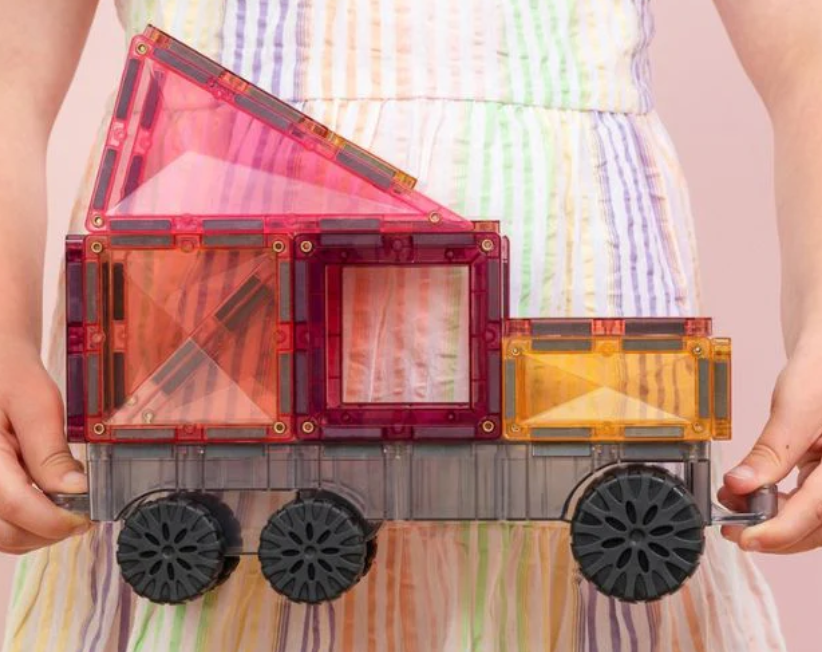
Remember the Futuristic truck I modelled earlier, then take a look at this short video that will show you something similar!
Introducing Connetix, a super magnetic toy that kids can build absolutely anything with the power of magnets, linking up from a net to a 3-dimensional shape!
I highly recommend this great Connetix Magnetic Toy,
A Connetix magnetic tile set.
Here's a truck created with Connetix tiles.
When you click links in this post and make a purchase, I may earn a small commission at no extra cost to you. This helps support the craft projects shared on this website.😀
“For children who enjoy hands-on play, open-ended toys like magnetic tiles offer another way to explore shapes, patterns and problem-solving beyond puzzles.”
SOME FEATURE
🧲 What are Connetix magnetic tiles?
👉 Connetix are open-ended magnetic building tiles that children connect to build:
towers
animals
houses
patterns
They’re designed to support STEM / STEAM learning—helping children explore shapes, magnetism, and problem-solving through play
🧲 HOW CONNETIX TILES WORK
Each tile from Connetix has:
small magnets sealed inside the edges
strong plastic casing around them
👉 When two tiles come close, the magnets:
pull toward each other
and snap together
Magnets have a North pole
a South pole/opposites attract
Same poles push away.
This introduces children to early ideas about magnetism, balance and structure through play.
“Each Connetix set includes a mix of shapes such as squares, triangles and rectangles, allowing children to build both simple and more complex designs as their confidence grows.”
🧠 KEY BENEFITS
🧩 1.OPEN ENDED PLAY
Children can:
build freely
create their own designs
not limited to one build
👉 This supports imagination + creativity
🧠 2. COGNITIVE DEVELOPMENT
They help with:
problem-solving
spatial awareness
early maths concepts
✋ 3. FINE MOTOR SKILLS
connecting tiles
balancing structures
👉 great for little hands
🎨 4. VISUAL & SENSORY APPEAL
bright colours
clear tiles (light play!)
different shapes
👉 adds a sensory element—even if not “textured”
🔒 5. SAFETY & QUALITY
strong magnets
sealed edges
non-toxic plastic
CONNETIX construction toys aid in brain development!
HOW?
These magnetic toys provide lots of fun and in hand loads of educational exploration!
TO CONCLUDE!
In this post, I show you how to re-create something new from something old.
If you and your kids are crafters and you have some craft projects that have had their day, then don’t stress.
SOME IDEAS!
Maybe I have given you some ideas on how you can reinvent and make something completely different.
You will surprise yourself in doing so when you perhaps thought there was nothing more you could do with them.
RECYCLING!
In doing so, you are recycling your old projects, keeping on par with toy manufacturers who have or are going Green!
So just think you could do anything you want, sticking parts on parts and forming perhaps, your very own version of a Monster truck!