Here’s a nice craft activity you and your kids can make together, over the Valentine’s half-term week! ‘Making Playdough with kids’
Playdough a great kids resource!
Over the years, as part of our children’s learning, we’ve been making playdough in our school, because it’s a great resource for kids to have fun with and contribute to their learning!
WHAT ABOUT PLAYDOUGH!
Making playdough with kids is a super, quick and easy non-toxic mix of ingredients that is a great activity to do with kids!
Making homemade playdough.
The great thing is you probably have most of these ingredients in your cupboard, so it will be very affordable too!
MY INTENTION!
So during this half term, as it’s Valentine’s week, how about making your very own playdough at home, but not just any playdough, adding some texture, sparkle, and marbling that’s scented too!
VALENTINE IDEAS WITH PLAYDOUGH!
As it’s ‘love week’, wouldn’t it be nice to gift someone with something that reflects love, that’s a Valentine’s gift personalised just for them, that’s a bit different?
SAY IT WITH PLAYDOUGH!
Let’s take a look at some other possible love ideas………
Love hearts Lollipops*(see post below)
Picture Frames.*(see post below)
Valentine’s cards.
Playdough craft.
Cake.
Jewellery.
Below are a couple of projects that you can check-out and see the tecniques used to make love-hearts and picture frames.
As you may have gathered by now, I am going with playdough craft, and we will be making playdough with kids, as this will not only be a great activity to make together with your kids but also address some of these features, listed below.
In case you are looking for the ingredients to make your playdough check ingredients button below, but don’t forget to come back and checkout the rest of this post. ⇓
Playdough is an excellent resource for your kids to work on their fine motor skills and have fun while doing so.
Kids will bepulling, stretching,rolling and cutting, and at the same time usingtools to assist them in achieving these functions, leading them to be able to hold a pencil and handle a pair of scissors.
For example, these are the areas playing with playdough addresses…
Fine motor skills.
To be inventive.
Shaping.
Strengthening hands.
Using shape/cutters.
Being creative.
Sharing.
Competitive.
Eye and hand coordination.
Small talk.
Sparkly homemade playdough.
Here is some home-made sparkly playdough, with glitter in it to give it some pizzazz!
Before we start, take a look at how Play-Doh began and the follow-up adverts, to give you an insight into the story behind this type of playdough known as Play-Doh!
Interestingly enough, it is formulated with similar ingredients!
In the first video, check out this short clip, where Kay Zufall found an alternative to modelling clay, and hence the birth of Play-Doh!
In the second video, let’s take a look at how play doh evolved until today. It may also give you some useful ideas on what fun things you can make with your playdough!
ABOUT-PLAYDOH
Play-Doh has been around for a long time, and in the commercials, you can see how kids enjoy playing with it and all the fun things you can do with it.
WHAT YOU MAY NOT KNOW!
An unusual fact about this brand, known as Kudol, was originally designed as a wall cleaner, as at the time of its development, people had coal fires, and a lot of soot built up on their walls. Kudol was used for this purpose.
Then, with the modernisation of heating, people turned to oil, gas or electric heating, so cleaning walls was no longer needed.
PLAY-DOH WAS DISCOVERED!
Until a relative who worked in a nursery found a way to use this wallpaper cleaner, because of its non-toxic ingredients and how it was made, it made a great substitute for clay, and an excellent resource for kids to play with, again and again, and the rest is history!
BACK TO THE CRAFT IN-HAND!
TYPICALLY!
Love heartsare featured a lot onValentine’s Day.Whether it be onValentine’s cards, ornaments, chocolates or Jewellery.
So ‘Love Hearts’ will be what I will be the most favourable theme for this project.
FOR WHO?
MAKING IT FUN!
It all depends on who your kids would like to give a Valentine’s Day crafted gift to.
So would it be for Mum, Dad, or Mum and Dad, or Gran, Granddad, or both?
Whichever way this activity is made, it can be gifted to anyone!
Once you have decided to whom you are gifting your love heart, then you can personalise it how you like, with special wording and embellishment, or you can make a space to embed a fun picture within it; you choose, it’s your creation!
BE INVENTIVE!
Doubling it up, making it big or having small love hearts around it, is a possibility. You can improvise accordingly, and the beauty is that it’s playdough, you can re-shape it, adding or removing parts, until you get it just how you want it!
SAY IT WITH WORDS!
You can even roll some playdough and make words to set it off, or embed embellishments in the playdough before it dries!
HOME-MADE PLAYDOUGH AND VALENTINES!
So, how do we address homemade playdough and Valentine’s Day?
Well, Valentine’s Day depicts love, which is generally shown in a red, pink, or vibrant orange colour.
So I will choose between these colours.
Have you thought of anything else that might be favourable within this mix?
How about flowers?
WHAT ELSE CAN WE USE?
Flowersare very popular as a Valentine’s gift; they show love, appreciation, thoughtfulness, gratitude and great joy!
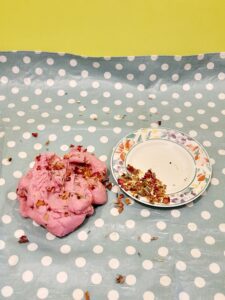
For this activity, I shall use a dried-up mixture of flowers, rather than real flowers.
LIKE A MAGICAL CAULDRON!
Something else I thought may just do the trick, and it’s tweaking it a bit, and would just add a tiny bit more depth to the playdough, is torn-up bits of tissue paper, glitter, and some marbling!
EXPERIMENTAL!
This is purely experimental, mind you. I have made playdough for the children in our school numerous times, but in this activity, I shall be adding a bit of texture and see how we go!
LET’S MAKE HOME-MADE PLAYDOUGH!
All you need is to find what you already have in the cupboard.
The main ingredients would beflourandsalt,which we probably all have anyway. Here’s what else you would need.
Vegetable oil, cream of tartar, food colour and boiling water.
These are the ingredients we use in our school to whip up some playdough for the kids.
INGREDIENTS.
2 cups flour.
1 cup salt.
4 tbsp oil.
4 tsp. cream of tartar.
2 cups boiling water.
Food colour.
Food flavouring.(peppermint)
You will need a rolling pin, a large mixing bowl and a plastic sealant container.
Resources for textured playdough hearts.
For this project, these are the additional ingredients.
Dry flowers
Torn-up bits of tissue paper.
Glitter.
Some trinkets, or photos.
Some blue food colouring for marbling.
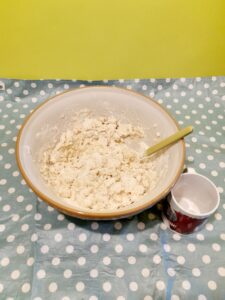
METHOD.
First,mix the dry ingredients. The flour, salt and cream of tartar, dry flowers and mix. Then add the oil.
Next,add the first cup of boiling water, and in the second cup of boiling water, add some food colouring and a few drops of food flavouring.
Aftermixing the whole lot, keep mixing until the mixture binds together. Use your hands to mould it into a smooth dough.
Finally,allow it to cool down, and then it’s ready to start to mold.
If you are not ready to use it straight away, then store it in a plastic sealable container or plastic bag.
I didn’t have any love heart cutters, so I decided to make them instead.
With a strip of flexible card, some foil and tape, I managed to whip up three different sizes.
CRAFTED LOVE-HEART CUTTERS.
1) You need foil, flexible card sellotape, scissors and round shapes.
2) Cut a long strip of card approx. 2.5cm wide and up to 50cm long.
3) Now cut some foil and wrap in around the strip of card tightly.
4) Tape up the foil to hold in place.
5) Fold in half.
6) Use rounded shapes to curl the foil to make the shape of the top of heart.
7) Once you have moulded the round parts of the heart tape the ends to hold in place.
8) Cut off unwanted parts.
10) This ia a heart shape cut out of playdough using one of the cutters. Push down carefully holding into place then peel away the dough.
So now we have the love heart cutters, we are ready to make the home-made love hearts, making Playdough with Kids!
ARE YOU READY?
1) Add all the ingredients in the bowl and mix together.
2) Until all has binded together, then add 1 cup of boiling water.
3) Then add less then a 1/4 of a bottle of food colouring into the 2nd cup of boiling water.
4) When it's all mixed together until you have a pinkish dough.
5) When dough is not too hot, you can knead it more until you have a smooth texture.
6) Now divide the playdough into 3 equal parts.
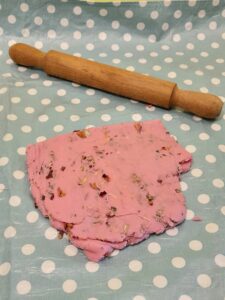
7) Take one ball of dough and bind in the dry flowers.
8) Roll out like so, with a rolling pin.
9) Grab a large heart shaped cutter and push into the rolled out dough.
10) Carefull prize of and push back the heart so you don't loose shape.
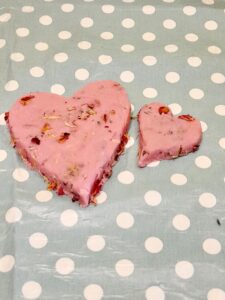
11) Do the same with a smaller heart shaped cutter.
12) Here are two playdough heart shapes.
13) You can keep going depending what design you would like.
14) Here is the smaller heart on top of the larger heart.
15) Take another ball of pink dough and mix and bind in the torn pieces of tissue papers.
16) Until your ball is multi-coloured.
17) Cut out as before a larger heart and a smaller heart if you like.
18) Now with the final pink dough, pour in your glitter.
19) Mix glitter until you have a glittery ball.
20) Now cut out your hearts.
21) Here are your selection of hearts. Leave for a few days to dry out.
DRY IT OUT!
Once you have finished your love-heart, place it in a safe place and allow it to dry. Keep a check on it, and when it has hardened up, it is ready to wrap up and gift it.
Glue on parts if they are loose with PVA glue.
Here are some of the love hearts I made with a different textured finish. You can decide which you prefer to make, and once they have dried out, you can wrap them up and gift them.
Click on the image to go bigger.
On the left with dry flowers and on the right with torn tissue papers.
Marble effect, pink and blue colours.
Add a face or roll out words.
Marbled hearts with picture.
I introduced my grandson to the spare playdough I had made. It kept him busy for ages! Working with tools and learning how to use a rolling pin, cutting and making his very own cupcakes!
PLAYDOUGH, A GAME CHANGER!
My grandson loved it! So now I know what to turn to when he next visits. I wasn’t sure if he would enjoy playing with it, but he found loads of interesting solutions, even planting all his safari animals within the dough, and making tons of footprints lol!
SOME TIPS!
DIFFERENT COLOURS.
If you are not sure what colour to choose, or you want more than one colour, instead of colouring the whole amount of dough. You can divide the dough into parts and add different food colours to each ball of dough.
Bind and mould until the colour blends in.
DIFFERENT TEXTURES.
When adding your different textures, it will come out a bit rough around the edges, but I think this adds to its uniqueness.
You can wear disposable gloves to keep your hands clean.
KEEP KIDS SAFE.
Watch out with boiling water if your kids are close by.
Also, adults should mix by hand if the mixture is very hot, until it cools down slightly, then your kids can help squish and squash it.
MAKE OR BUY.
I quickly made heart-shaped cutters, but you can purchase these in most supermarkets, online, or hobby shops.
MARBLING EFFECT.
Last minute, I decided to mix two colours for the marbling effect.
I made a separate dough and coloured it with blue colour, then mixed it in with the pink that I had already made.
Marbling works well if food colours are quite dark; then you will get more of a dramatic two-tone effect.
Allow your love hearts to dry well, and keep turning them over to allow them to air.
TO ADD SCENT.
To add a fragrance to your playdough, simply use food flavouring. I prefer using peppermint; this is lasting and has a fresh aroma.
Or you can use essential oils, like rose or lavender, which can work too.
Hey there, when you click on links in this post, and you make a purchase, I may earn a small commission that l can use towards resources (other than throw-outs) for project making within my website😀
So how do you entertain your kids during the half-term holidays, but not just over the half-term holidays…..all year round
WHERE TO TAKE YOUR KIDS?
Where you don’t have to stress about finding suitable locations, activities, and films to see, or the wonder of animals in their environments, and to experience indoor or outdoor quests, then look no more, as KIDS PASS may just have what you are looking for!
NO.1 FAMILY SAVING CLUB!
SIGN UP NOW, AND SAVE ON YOUR NEXT DAY OUT!
WITH KIDS PASS MEMBERSHIP, YOU CAN SAVE AT 1000’S OF LOCATIONS, 7 DAYS A WEEK!
All you need to do for just £1 you can try them out for 30 days, and see what deals you can find!
In this post, I show you how easy it is to bind together a few ingredients and magically whip up some homemade playdough!
CRAFT LOVE-HEARTS!
As it’s a Valentine’s half term, you can work together to make super love hearts, that can have their own bestoked look!
PERSONALIZE IT!
Just by adding some different textures, you can personalise the playdough to suit the person you are gifting it to!
Whether it’s dry flowers, special scent, or adding fun embellishments, the choice is yours!
YOUR CHOICE HOILIDAY FUN!
So whether you want to just make love hearts for Valentine’s Day, or simply make coloured playdough as a holiday activity, then this is a great project to include that can be reused time after time, and all you need to do is store it in the fridge for the next time!
HAPPY VALENTINE’S CRAFTING!
Oh, so don’t forget, if you get to try out this activity with your kids, I would love to show it off as an update within this post!
Making playdough with kids is such a delightful adventure! It’s not just about the end product but the joy and creativity that flow during the process. Engaging children in such hands-on activities is incredibly beneficial for their development, sparking their imagination and fine-tuning their motor skills. I see that in my nephews and nieces.
The idea of crafting playdough from scratch at home is a wonderful way to involve kids in a safe, creative, and educational activity. It’s a fantastic opportunity to teach them about mixing colors, understanding measurements, and even a bit of science as they watch simple ingredients transform into something new and exciting.
For anyone looking to create lasting memories and foster a love for creativity in their children, this activity is a must-try. It’s amazing how something as simple as playdough can become a gateway to endless possibilities in a child’s imagination.
And what’s even more impactful is that it’s a refreshing distraction from the tablets and phones that most kids are so engrossed in, and quite frankly, addicted to.
Would love to hear more about the specific recipes or creative playdough projects you’ve found to be a hit with the kids!
Hey Kevon, thank you for such a wonderful comment! You sure hit the nail on the head! We make playdough every week with the children, in our school, as it is rightly an excellent resource for kids to loose themselves in, finding new discoveries and manipulating the dough in so many different and wonderful ways.
Playing with playdough, can help advance their learning and the opportunity to use their hands which addresses fine motor skills. The children always love to volunteer in playdough making, as there is a science behind it, and it’s also a great activity too!
We make playdough weekly, using the same recipe within this post, as can you imagine the amount of kids that play with it, eventually either gets used up, disappears, or it’s had its day with over-use and being aired through out the day, but making your own would be just right for your kids, to use daily and simply store it in the fridge.
You will know when it’s time to throw it out when it keeps, breaking up and kind of looses its flexiblity.
I agree with you, we need some form of distraction for kids to focus on something three-dimensional, away from too much screen time, and something as simple as this would encourage brain development and open inventive doors, and experiences!
Generally, we will make unusual types of playdough, depending on the resources available, we have made chocolate dough by adding lots of chocolate powder, which gives this rich chocolate colour and yummy smell, although even if they are tempted to taste it, it’s not that pleasant because of the amount of salt that’s in it, but hey it will be a sensory experience, and they learn from it lol.
Once again thank you for you super comment.
Happy Crafting!
Julia. ?
What a delightful adventure you’ve shared in making playdough with kids! The joy and creativity that flow during the process are indeed invaluable. Engaging children in such hands-on activities is not just about the end product; it’s about sparking their imagination and fine-tuning their motor skills. Your dedication to this in your school is commendable.
I can remember making a similar recipe as this in my childhood!
Making playdough from scratch at home is a fantastic opportunity to make learning fun. Teaching kids about mixing colors, understanding measurements, and witnessing the transformation of simple ingredients into something exciting is a beautiful way to combine education with creativity. It seems most of my color mixes always ended up purple!
It’s heartening to see how this activity gives the kids a refreshing distraction from the digital world, providing an engaging alternative. I appreciate your emphasis on creating lasting memories and fostering a love for creativity in children.
I’m curious to know more about specific recipes or creative playdough projects that you’ve found to be a hit with the kids. Any special twists or additional ingredients that bring an extra element of fun to the playdough-making process?
Hey Chas thanks for your super comment! This type of resource is quite unique and very under estimated!
The activity alone offers a wide range of learning skills, from measurments, mixing colours watching transformations,and as you rightly say ignighting their imagination,and creativity that inhand lead to the development of the childrens fine motor skills.
When mixing two colours together, at first the marbelling looks great, but when the playdough is manipulated, squished, rolled and moulded together again, you kind of loose its marbelling effect and it merges into one mass of colour! Why purple,is bizzare lol!
When I mixed the blue and pink together, I got purple too! Maybe stick to one colour, at least you know it won’t metamophosise into a strange purple!
As for unusual playdough mixes, well today we made a bright green playdough, with added herbs for slight texture, colour, aroma and generally enhancement!
For messy play outdoors, we made a mix of flour and baby oil, no colour just plain old neutral. It’s very crumbly, and has a divine scent. The texture is very crumbly and squiggy, and the kids just love to squash and smash it making an incredible mess everywhere then they would add run ducks, boats within it and water to liquify it!
My favourites are bright orange playdough with orange food flavouring, smell so citrusy,and has that summer feel to it, and lime-green with peppermint food flavouring so fresh,and exhilirating. It always smells kind of clean! if you use pepperment essential oil you have the anti-bacterial properties within it, combating bacteria, that of antiviral and fungicidal. This could be useful keeping the playdough clean-ish from childrens grubby hands lol!
So glad you enjoyed this easy activity to do, and for-ever lasting once you pop it in a sealable container in the fridge, that is if the kids, or you don’t wear it out firs!
Happy Crafting!
Julia.
Play Dough is not an activity I usually do with my kids. But after reading this post, I’m delighted to say ‘hey, I wish I knew about this earlier’. I’m glad that I know now. I definitely going to do this with my nieces and nephews one day. Thanks a lot!
Your welcome, and I am glad you got alot out of this activity, once you have got all the ingredients, it’s easy peasy and the best part is you can store the homemade play dough in the fridge, it will last for ages! Also you control what goes into the making of this play dough, no chemicals, and it is from my experience kids number one, go to activity and their imagination is endless in what they can make with it, time and time again!
So thanks for your comment appreciate you dropping by, and start getting creative with your nieces and nephews as I am sure they will have lot’s of fun, in not only making it together, but enjoying enless hours of making and smashing it up again for more creative ideas!
Julia.😊


Making playdough with kids is such a delightful adventure! It’s not just about the end product but the joy and creativity that flow during the process. Engaging children in such hands-on activities is incredibly beneficial for their development, sparking their imagination and fine-tuning their motor skills. I see that in my nephews and nieces.
The idea of crafting playdough from scratch at home is a wonderful way to involve kids in a safe, creative, and educational activity. It’s a fantastic opportunity to teach them about mixing colors, understanding measurements, and even a bit of science as they watch simple ingredients transform into something new and exciting.
For anyone looking to create lasting memories and foster a love for creativity in their children, this activity is a must-try. It’s amazing how something as simple as playdough can become a gateway to endless possibilities in a child’s imagination.
And what’s even more impactful is that it’s a refreshing distraction from the tablets and phones that most kids are so engrossed in, and quite frankly, addicted to.
Would love to hear more about the specific recipes or creative playdough projects you’ve found to be a hit with the kids!
Hey Kevon, thank you for such a wonderful comment! You sure hit the nail on the head! We make playdough every week with the children, in our school, as it is rightly an excellent resource for kids to loose themselves in, finding new discoveries and manipulating the dough in so many different and wonderful ways.
Playing with playdough, can help advance their learning and the opportunity to use their hands which addresses fine motor skills. The children always love to volunteer in playdough making, as there is a science behind it, and it’s also a great activity too!
We make playdough weekly, using the same recipe within this post, as can you imagine the amount of kids that play with it, eventually either gets used up, disappears, or it’s had its day with over-use and being aired through out the day, but making your own would be just right for your kids, to use daily and simply store it in the fridge.
You will know when it’s time to throw it out when it keeps, breaking up and kind of looses its flexiblity.
I agree with you, we need some form of distraction for kids to focus on something three-dimensional, away from too much screen time, and something as simple as this would encourage brain development and open inventive doors, and experiences!
Generally, we will make unusual types of playdough, depending on the resources available, we have made chocolate dough by adding lots of chocolate powder, which gives this rich chocolate colour and yummy smell, although even if they are tempted to taste it, it’s not that pleasant because of the amount of salt that’s in it, but hey it will be a sensory experience, and they learn from it lol.
Once again thank you for you super comment.
Happy Crafting!
Julia. ?
Hi Julia,
What a delightful adventure you’ve shared in making playdough with kids! The joy and creativity that flow during the process are indeed invaluable. Engaging children in such hands-on activities is not just about the end product; it’s about sparking their imagination and fine-tuning their motor skills. Your dedication to this in your school is commendable.
I can remember making a similar recipe as this in my childhood!
Making playdough from scratch at home is a fantastic opportunity to make learning fun. Teaching kids about mixing colors, understanding measurements, and witnessing the transformation of simple ingredients into something exciting is a beautiful way to combine education with creativity. It seems most of my color mixes always ended up purple!
It’s heartening to see how this activity gives the kids a refreshing distraction from the digital world, providing an engaging alternative. I appreciate your emphasis on creating lasting memories and fostering a love for creativity in children.
I’m curious to know more about specific recipes or creative playdough projects that you’ve found to be a hit with the kids. Any special twists or additional ingredients that bring an extra element of fun to the playdough-making process?
Hey Chas thanks for your super comment! This type of resource is quite unique and very under estimated!
The activity alone offers a wide range of learning skills, from measurments, mixing colours watching transformations,and as you rightly say ignighting their imagination,and creativity that inhand lead to the development of the childrens fine motor skills.
When mixing two colours together, at first the marbelling looks great, but when the playdough is manipulated, squished, rolled and moulded together again, you kind of loose its marbelling effect and it merges into one mass of colour! Why purple,is bizzare lol!
When I mixed the blue and pink together, I got purple too! Maybe stick to one colour, at least you know it won’t metamophosise into a strange purple!
As for unusual playdough mixes, well today we made a bright green playdough, with added herbs for slight texture, colour, aroma and generally enhancement!
For messy play outdoors, we made a mix of flour and baby oil, no colour just plain old neutral. It’s very crumbly, and has a divine scent. The texture is very crumbly and squiggy, and the kids just love to squash and smash it making an incredible mess everywhere then they would add run ducks, boats within it and water to liquify it!
My favourites are bright orange playdough with orange food flavouring, smell so citrusy,and has that summer feel to it, and lime-green with peppermint food flavouring so fresh,and exhilirating. It always smells kind of clean! if you use pepperment essential oil you have the anti-bacterial properties within it, combating bacteria, that of antiviral and fungicidal. This could be useful keeping the playdough clean-ish from childrens grubby hands lol!
So glad you enjoyed this easy activity to do, and for-ever lasting once you pop it in a sealable container in the fridge, that is if the kids, or you don’t wear it out firs!
Happy Crafting!
Julia.
Play Dough is not an activity I usually do with my kids. But after reading this post, I’m delighted to say ‘hey, I wish I knew about this earlier’. I’m glad that I know now. I definitely going to do this with my nieces and nephews one day. Thanks a lot!
Your welcome, and I am glad you got alot out of this activity, once you have got all the ingredients, it’s easy peasy and the best part is you can store the homemade play dough in the fridge, it will last for ages! Also you control what goes into the making of this play dough, no chemicals, and it is from my experience kids number one, go to activity and their imagination is endless in what they can make with it, time and time again!
So thanks for your comment appreciate you dropping by, and start getting creative with your nieces and nephews as I am sure they will have lot’s of fun, in not only making it together, but enjoying enless hours of making and smashing it up again for more creative ideas!
Julia.😊