Why is it that kids like anything monstrous, especially with teeth? In this category fall the DINOSAURS.
Anything scary, loud and with teeth, where kids are compelled to snap away at you with a dinosaur-ish like ROARRRRRR!
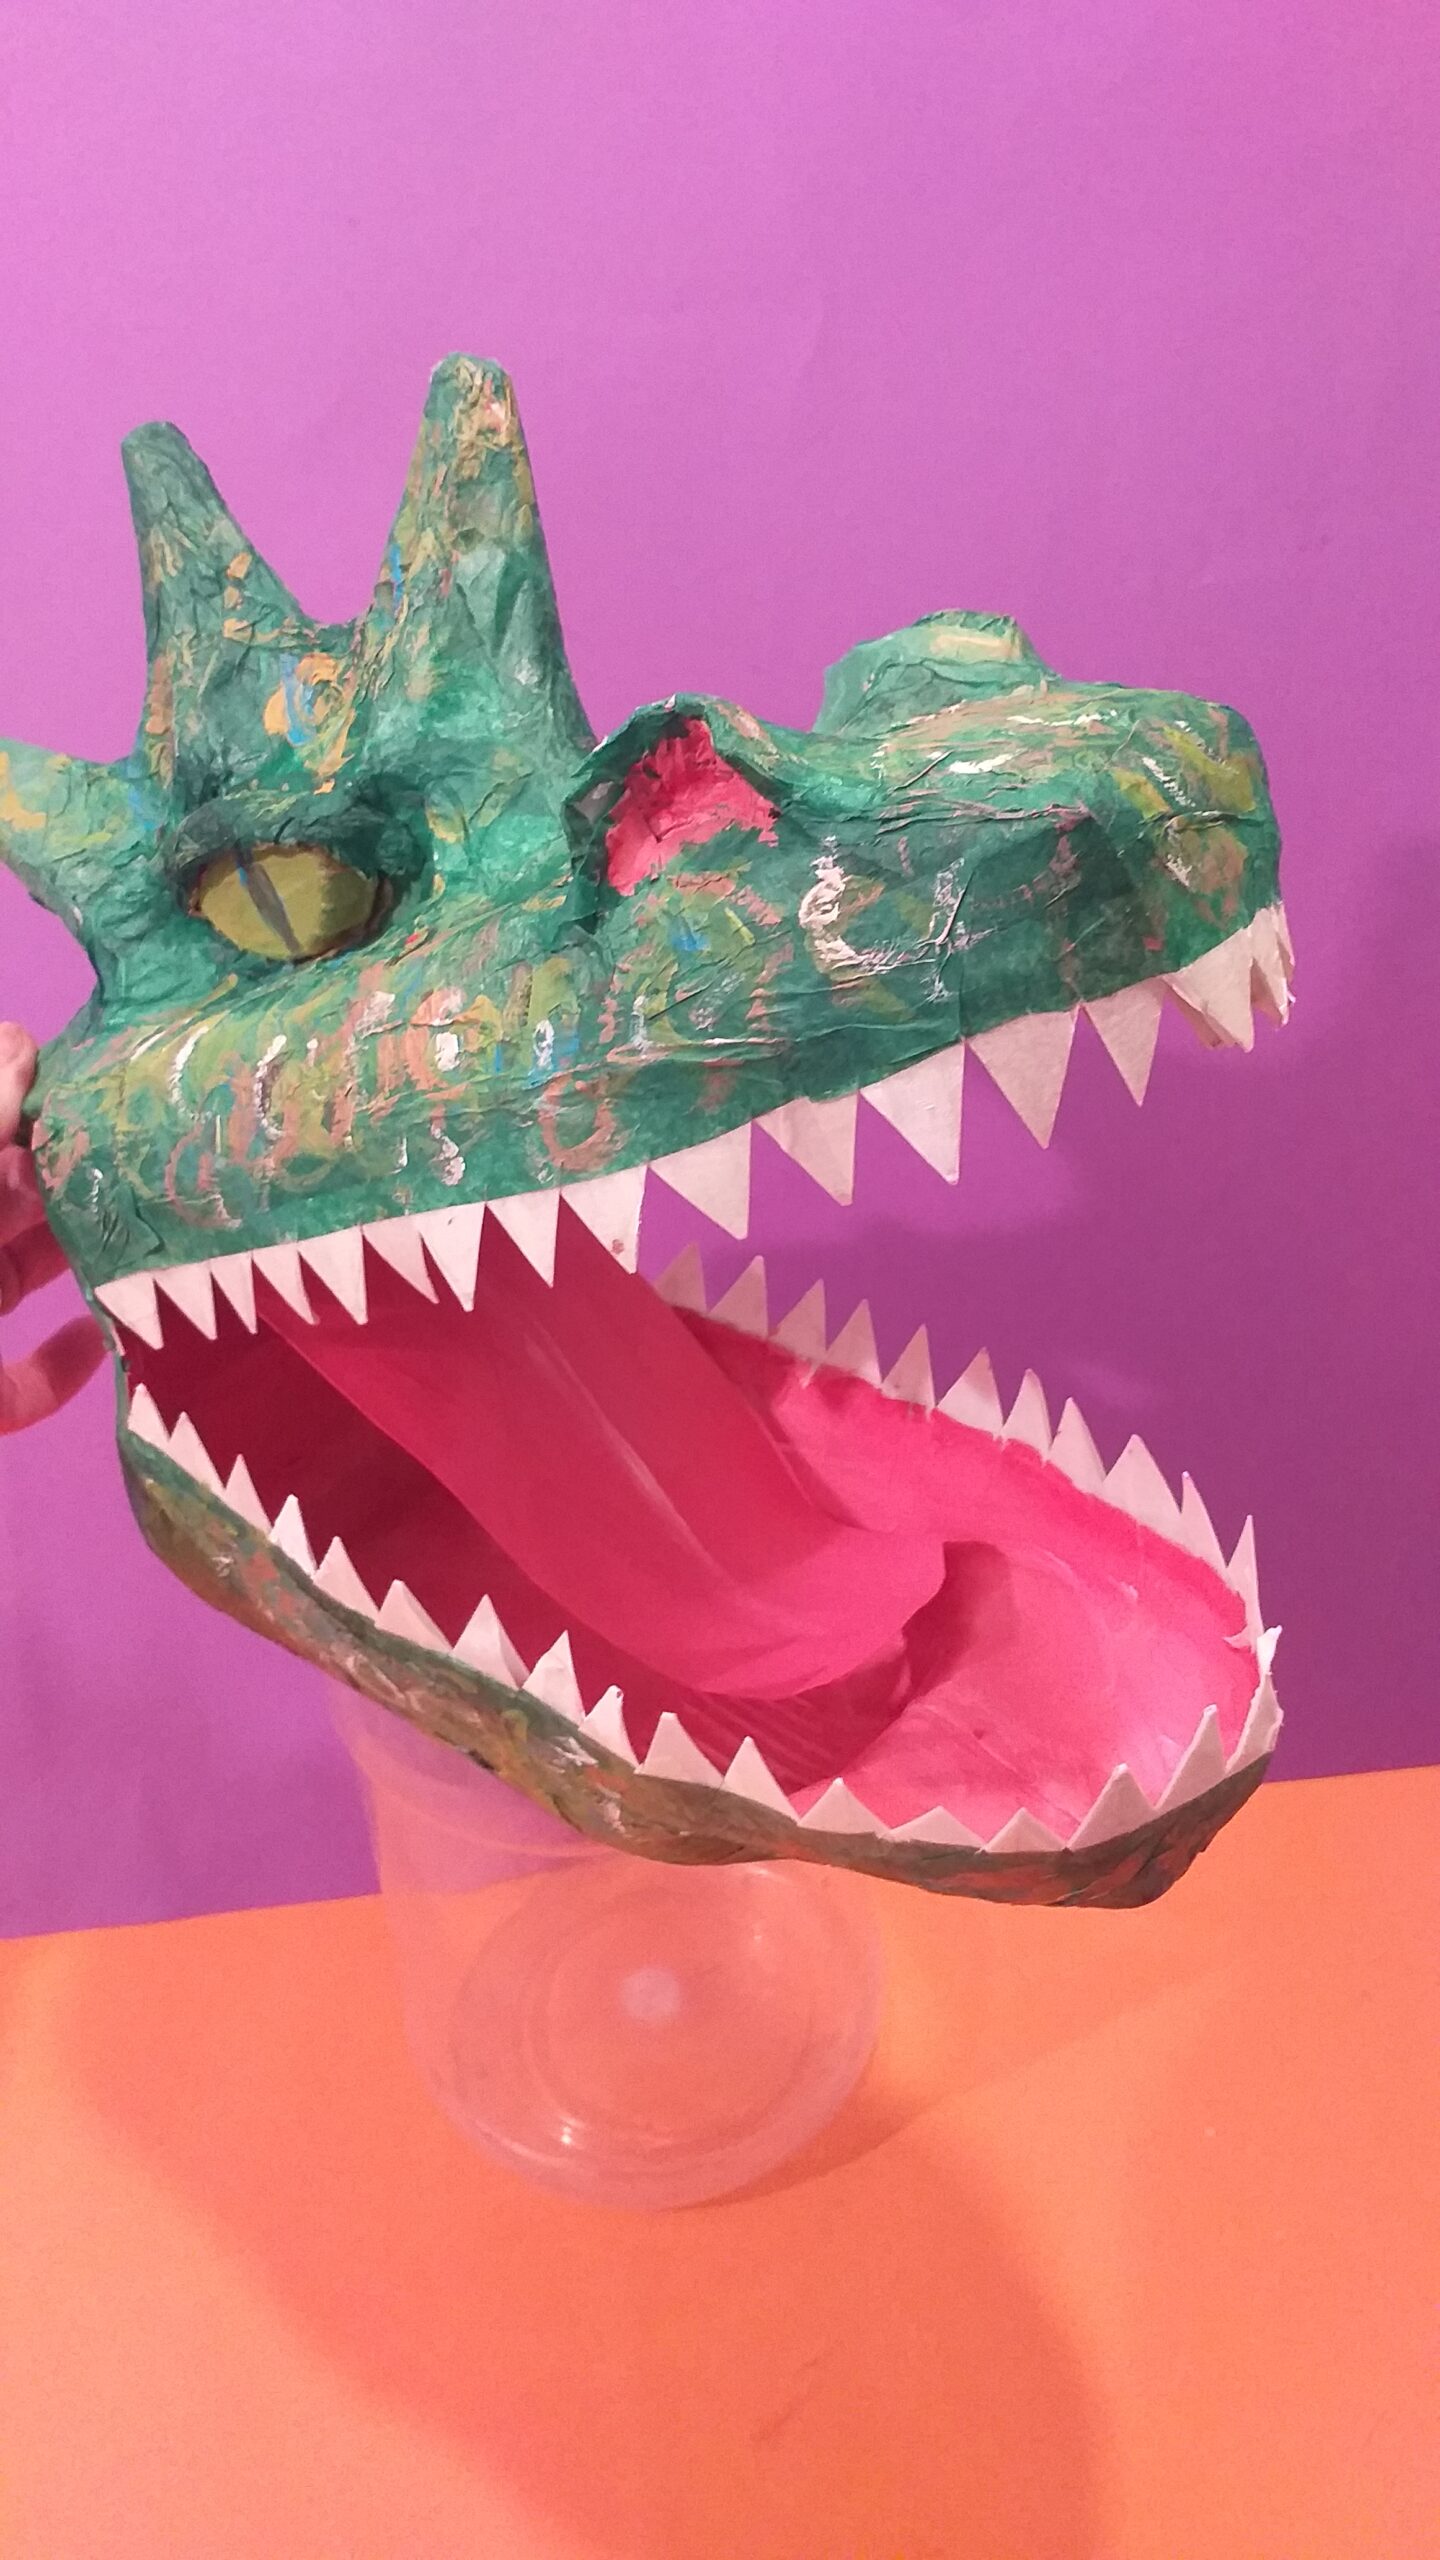
So that’s why in this post I shall show you how to craft a Milk Bottle Dinosaur!
WHAT A MIX!
In the kids’ world Dinosaurs come in all guises, whether it’s Lego, plastic rubbery type toys, remote control with a roar or fun remote games.
KIDS CHOICE!
When kids go out to play they can choose what to pull out from the drawers and place into the messy trays, out come the dinosaurs.
MESSY PLAY!
I am referring to those common plastic types, which are versatile and hard-working. Cover them in shaving foam, hide them in glittery sand, or cover them in hay and small stones, some twigs and you are set to go!
MY INTENTION!
In this post, I am looking at something a bit simpler than some sophisticated toys, I am looking at a throw-out, something we could recycle and turn into a dinosaur.
CHECK-OUT RECYCLING!
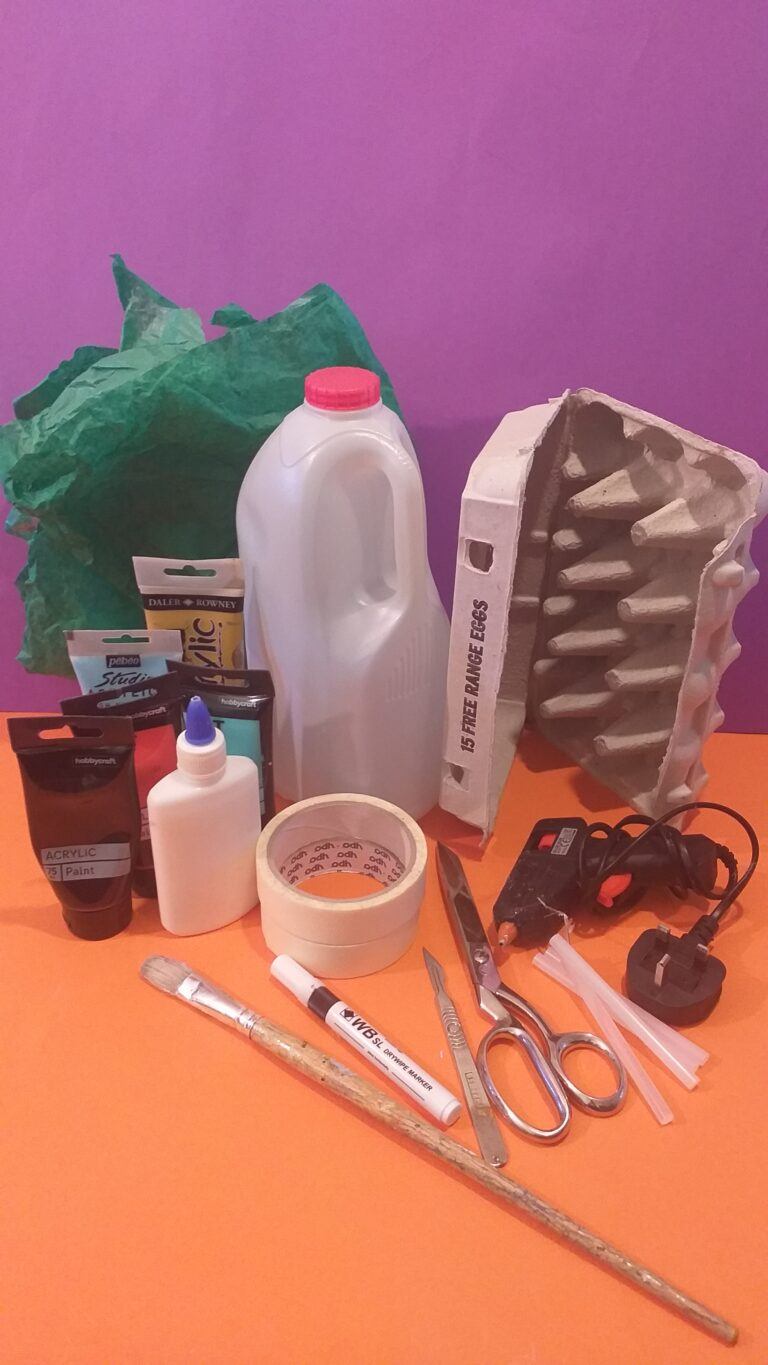
Having looked in my recycle bag, I raked through to find something that would make something close to a dinosaur’s head and I found some plastic bottles.
WHAT I FOUND!
I wanted a fairly large one that would make the head and jaw of the dinosaur and you guessed it a plastic milk bottle. This is what we are going to use to craft a ‘Milk Bottle Dinosaur!’
But first, before we begin our crafting let’s remind ourselves of the dinosaur era and how grand and incredible these species were that roamed our planet!
WHAT SIZE?
Dinosaurs come in all shapes and sizes, quite small like the size of a cat or as big as a school around 5 stories high and some could be approximately 100 feet in length from head right down to the end of their tails.
In this craft activity, we won’t be making anything that big, but it’s good to refer to information or images that you can take from what you need to help with your creation.
CRAFTING THE DINOSAUR HEAD!
When I first started to build the dinosaur head, I liked the idea of having spikes on its head that ran down its back.
WHAT DINOSAUR?
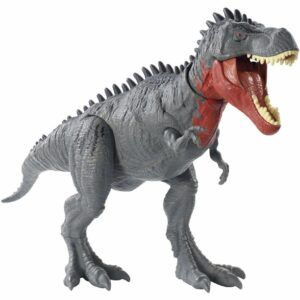
So I started to look for a dinosaur that was a challenge to make, I liked the idea of spikes and searched long and wide and came across one dinosaur that is known as a Tarbosaurus feeder a relative to the Tyrannosaurus or better known as T-rex.
FOUND ONE!
The Tarbosaurus I found had been modified somewhat for the Jurassic World movie, giving it a more fierce look which coincidently mirrors the dinosaur head I created.
Even though it’s a model or toy for kids it’s exactly like the Milk Bottle Dinosaur head I made.
Let’s take a look, especially at the head.
LET’S RECAP!
The Tarbosaurus name means ‘terrifying lizards’ and is regarded as the Asian version of the Tyrannosaurus Rex better known as T-Rex.
It’s similar to the T-Rex, with a big jaw, smaller limbs, a long tail and quite ferocious species. Here’s more information about the Tarabosauarus at:-
Hey there, when you click on links in this post and you make a purchase, I may earn a small commission that l can use towards resources (other than throw-outs) for project making within my website😀
Toys are made by Janod, renowned for their excellence and being very robust, with a difference and unique in their own right!
Here’s a taster take a look!
3D Triceratops puzzle.
Dinosaur Friends Apron.
Multi Activity Volcano.
Pop-up Dinosaur book.
Additionally!!!
Also,Baker Rosshas some fun Dinosaur kits to keep your kids busy, take a look Here!
PLUS….
Baker Ross offers a great selection of art resources. So if you are short of anything or you want to try out something new, then Baker Ross is for you!
SOME TIPS!
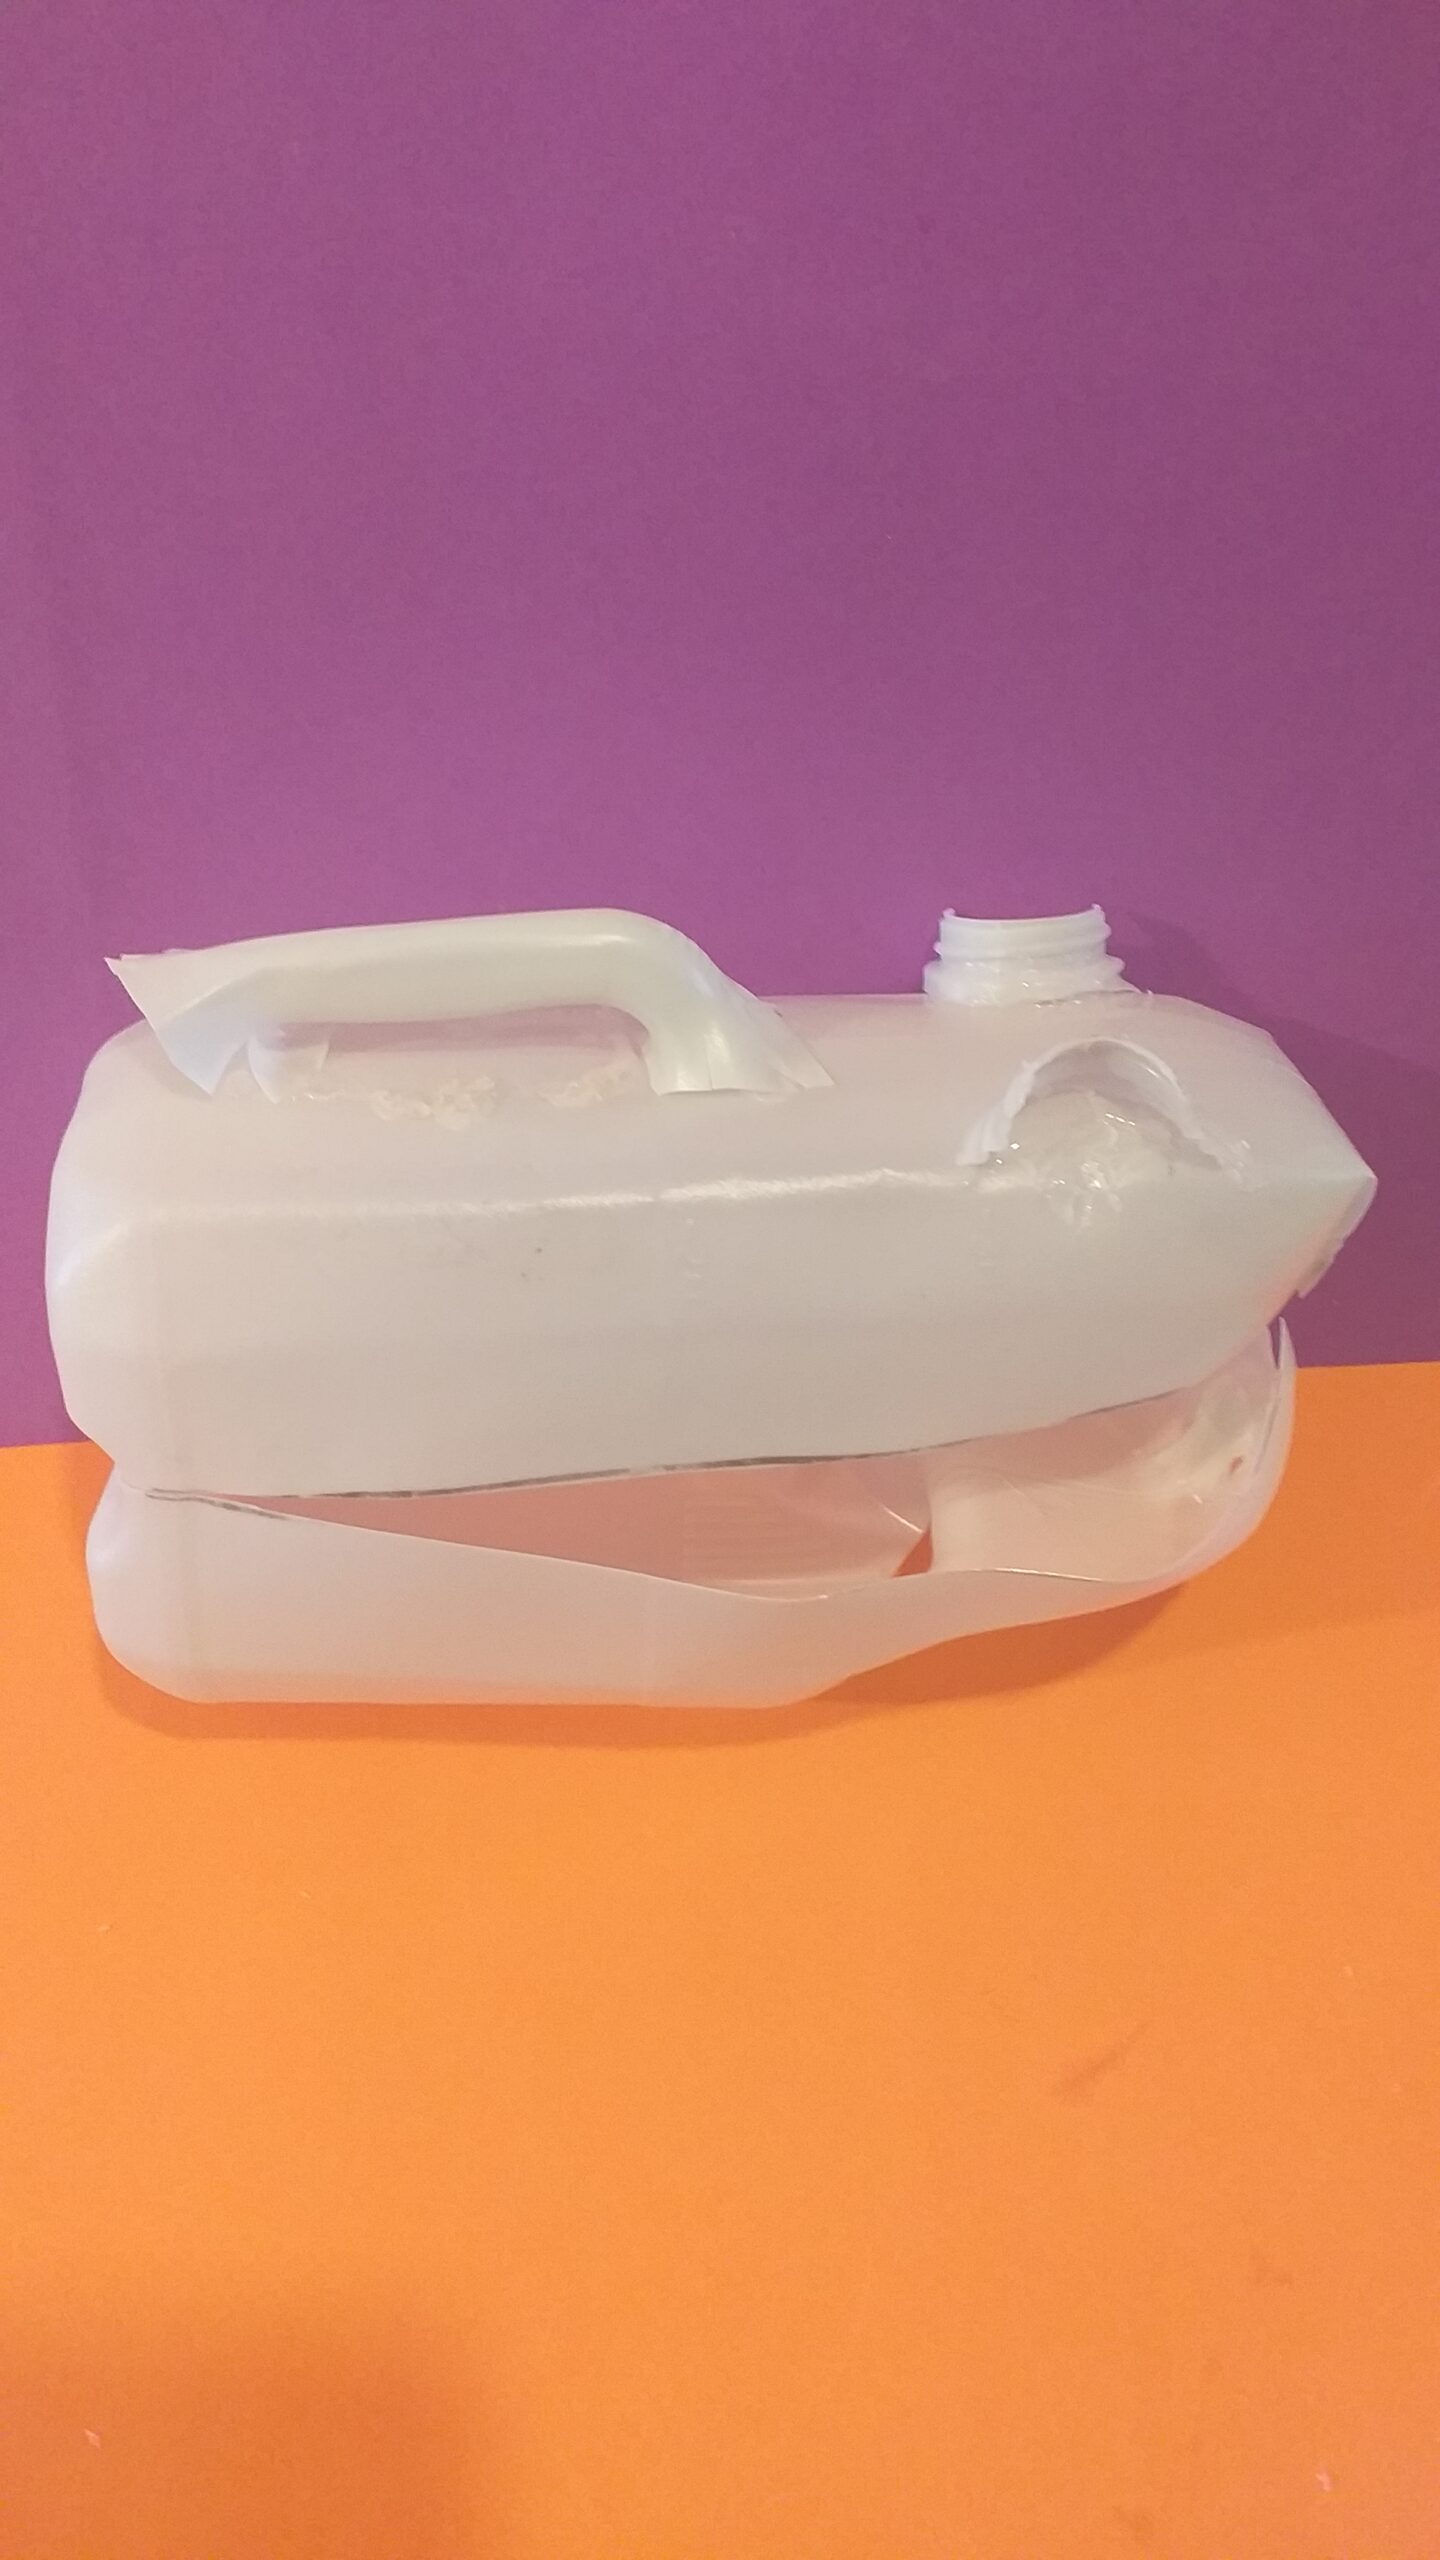
MOUTH. When cutting the bottle to create the mouth, so it opens and shuts, be careful not to cut the back end as this will be the hinge or the part that holds the mouth together.
TOP PART OF HEAD. The handle will be the top of the head and what will support the egg box points
SPIKE ON HEAD. Curving the egg box points is tricky so carefully bend and tape to the handle.
TO SHAPE MOUTH. Draw a couple of lines as shown snip them about 20mm in curl them inside one another then glue them whilst holding them together.
NOSTRILS. Position the 2 nostrils where you would like them to be and glue them into place.
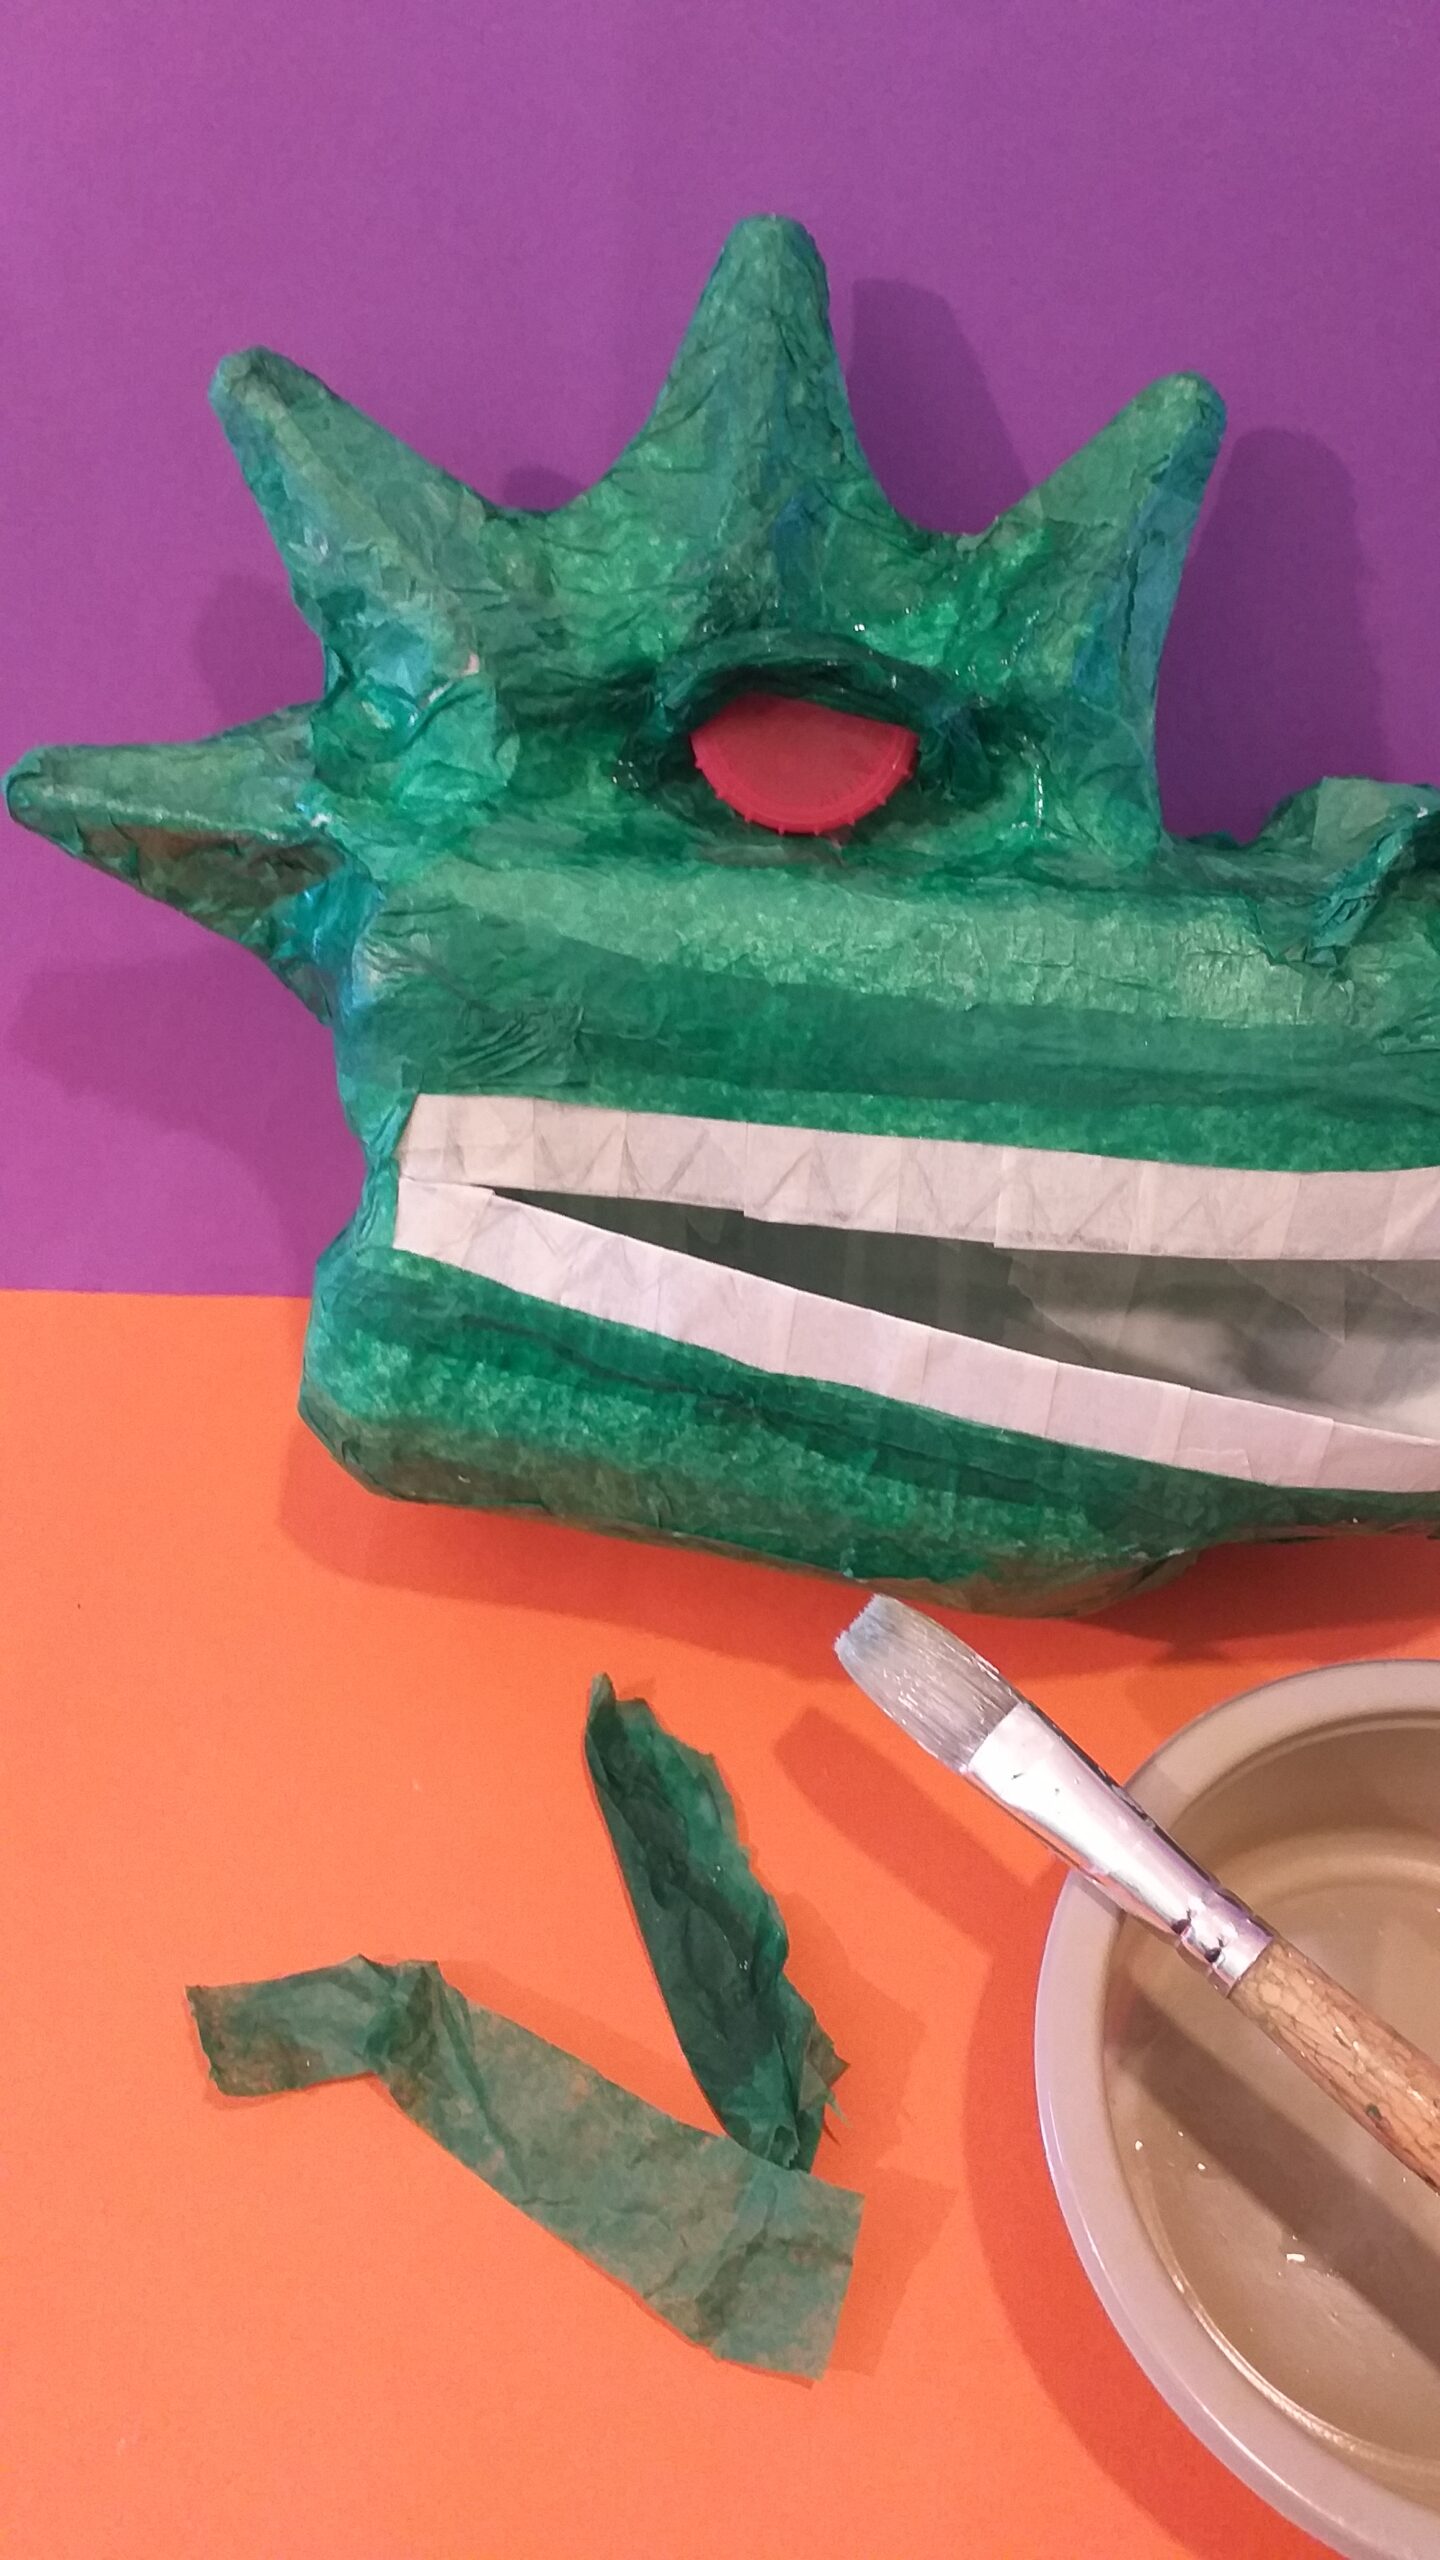
MASKING TAPE. Use masking tape to cover the whole head, which will secure all parts and give a good base to paint on, or instead use tissue paper.
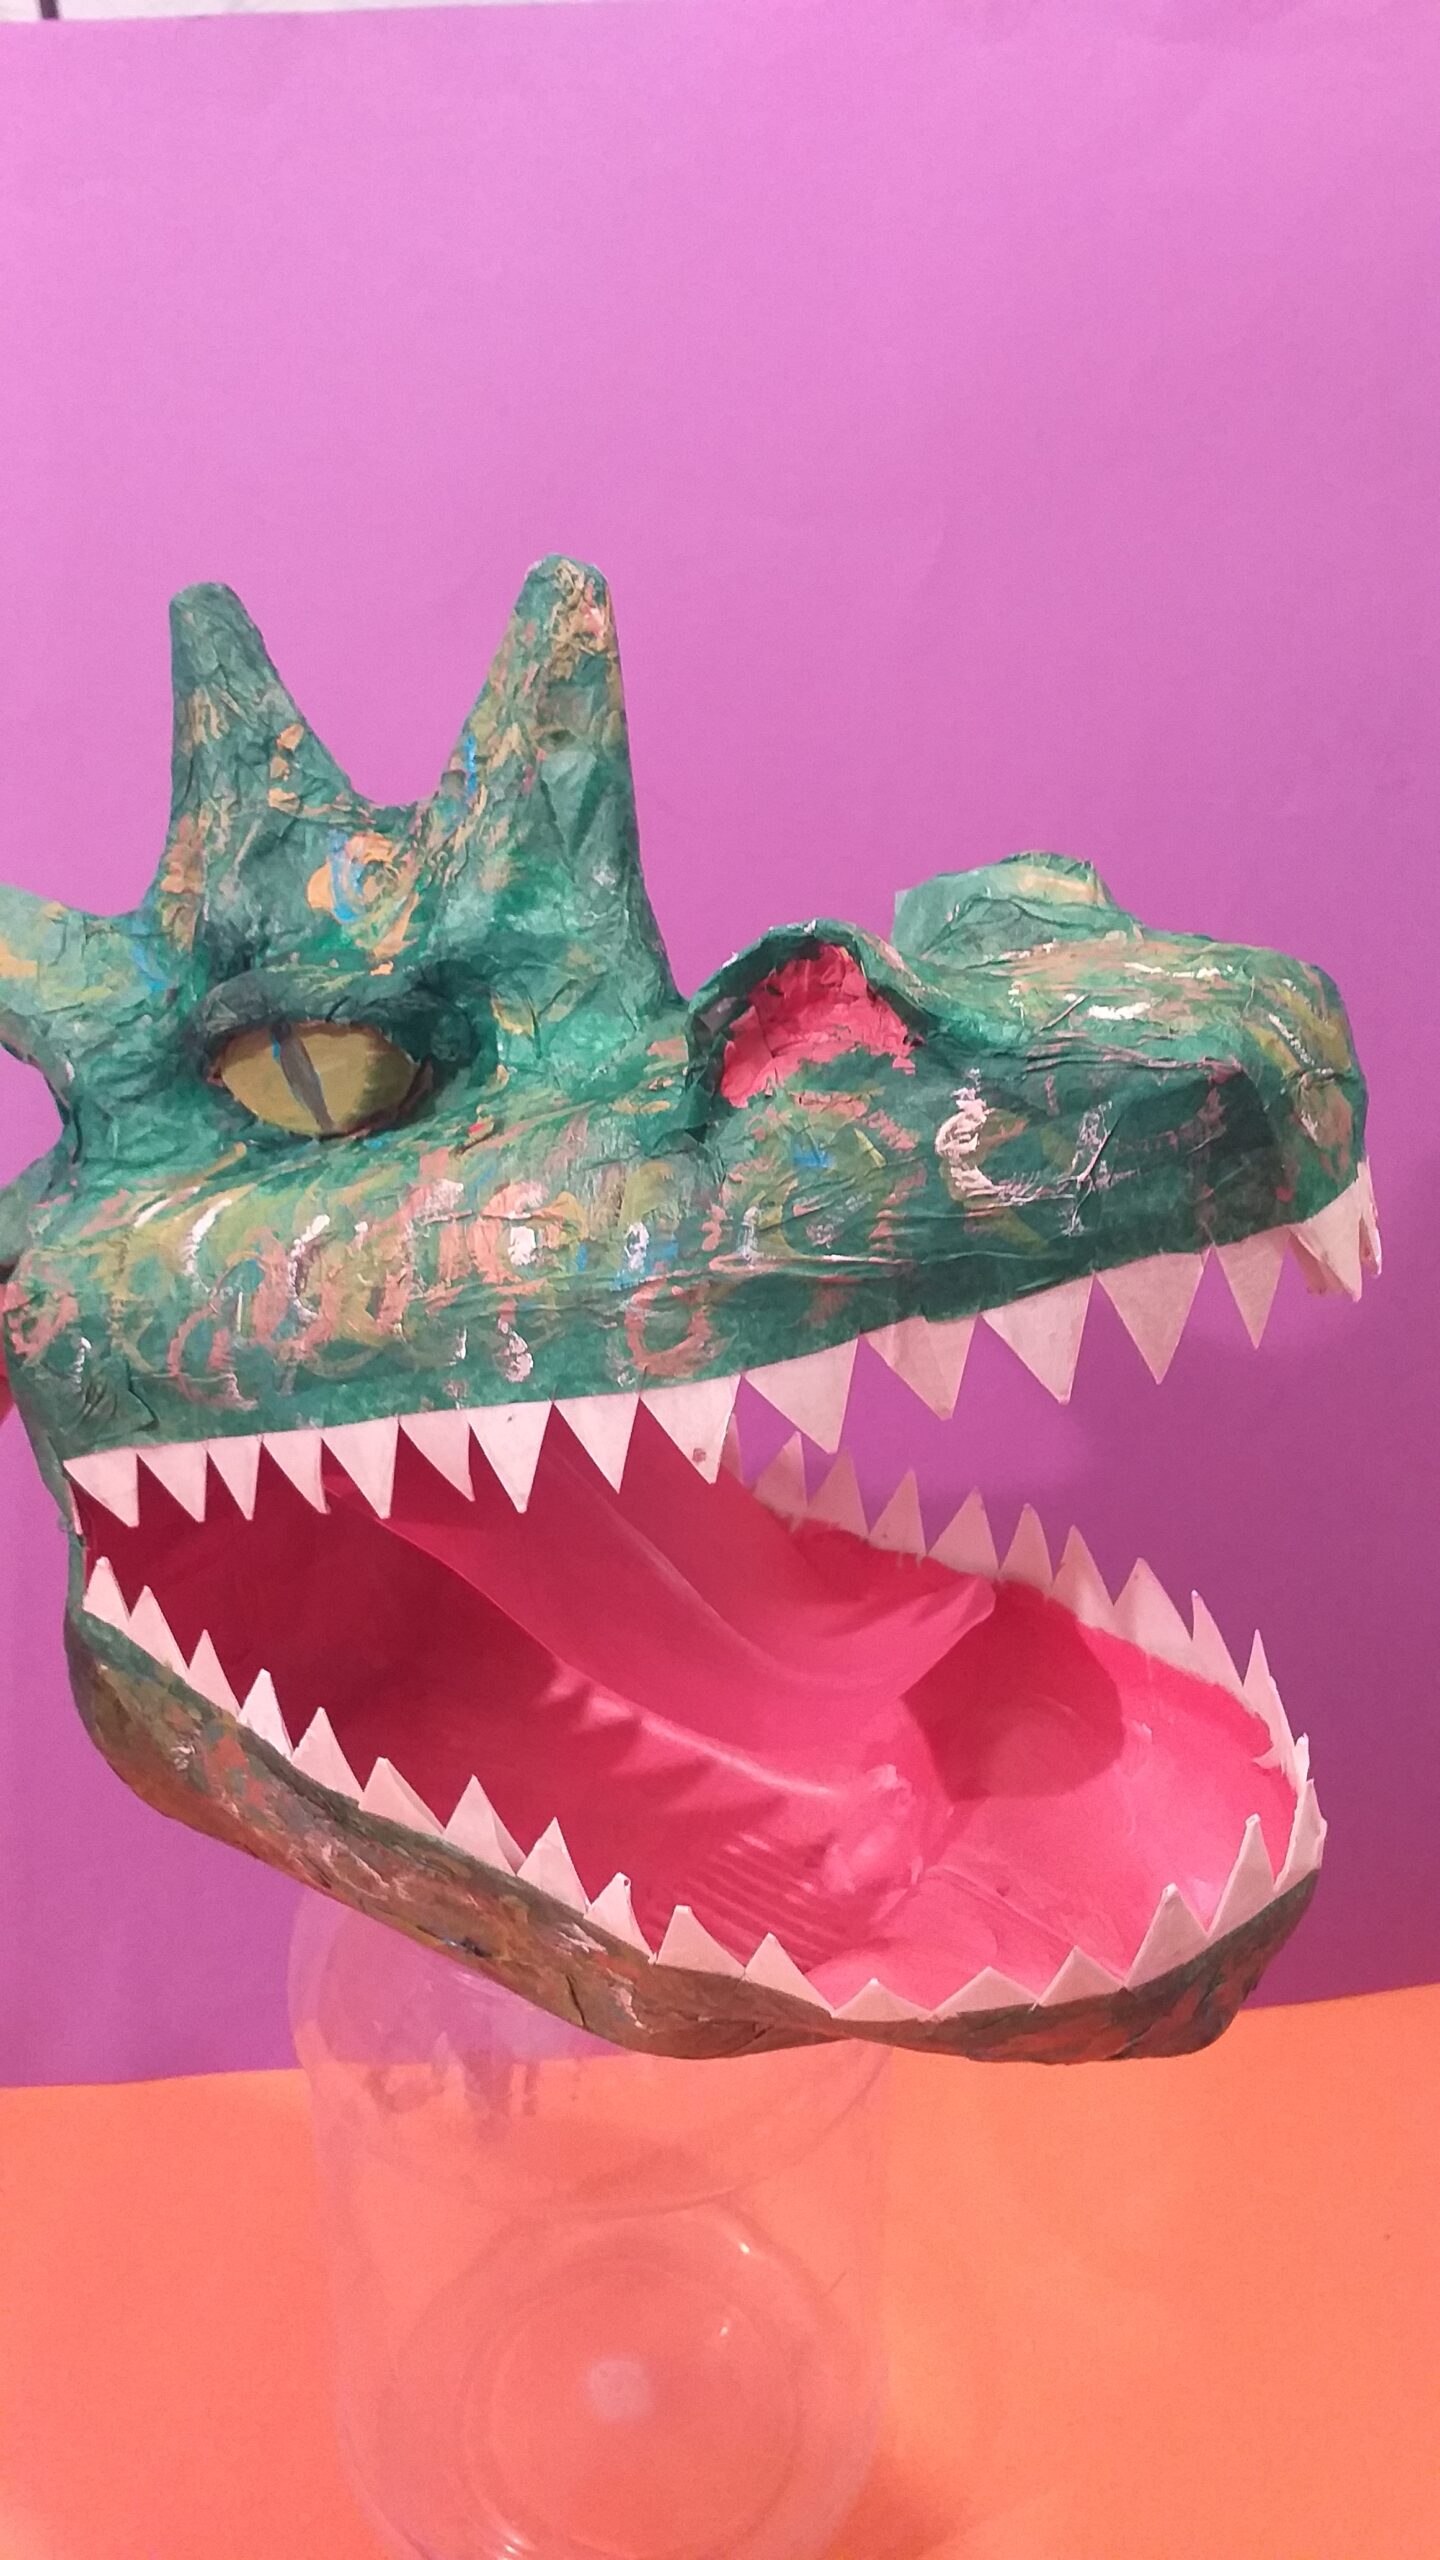
PAINT OR TISSUE PAPER. Choose to either paint the head or glue tissue paper for the finish. To add some texture dot or curl shapes like lizard skin and apply different shades this will give it depth and texture.
THE EYES. When glueing the eye position it in the hollow under the handle rounded part at the bottom and the straight part at the top then layer up folded tissue to make a heavy eyelid.
TEETH. Once you have covered the head with tissue, allow a white line for the teeth top and bottom of the mouth, then snip the teeth out all the way around.
INSIDE OF MOUTH. Finally, if you would like to show the inside of the mouth, paint it in pink and have a tongue cut out a long oval shape out of pink paper and tape it to the back of the mouth.
TO CONCLUDE!
There you have it. I hope you enjoyed making the Milk Bottle Dinosaur Head, it does look quite effective when opening and shutting its mouth especially for kids to do their roaring.
If you don’t like spikes, you can make a T-Rex instead. This method is a good foundation for any dinosaur’s head, or even to make it into a horse’s head.
MAGICAL CREATURES!
Why not make a magical creature a cross between a dragon and a unicorn?
Get your thinking heads on and do some sketches with your kids.
BE INVENTIVE THAT’S THE NAME OF THE GAME!
So let’s get creative with our inventions and have lots of fun in the making!
I would love to see what you come up with so drop us a line and I will update you with a picture of your creations!
SEE THE TARDOSAURUS IN ACTION!!!
ANOTHER FUN CRAFTING PROJECT!
Here’s another project that your kids might enjoy. It’s a different type of creature and smaller in size.
A turtle made out of egg cartons. Though smaller in size it’s fun to make and you can make baby turtles too!
Thanks for this lovely guide, as you gave me an idea for the perfect dad/son activity for this week. My five-year-old will love to craft this for his younger sis, and it’s you he should be thanking.
The site’s name suits it well. You’ve just gained a new follower. Keep it up, and I hope to see another DFY project like this one really soon.
Hi Gorjan, brilliant! glad you enjoyed the post and how to make a crazy dinosaurs head!
Kids get such a kick out of making anything that can flip, twist open and shut,
especially if it has a cool look too!
I would love to see your kids results, I could feature it as an update on my post and would
be great to see a convention of dinosaurs Roarrrrrr!!! lol
Brilliant! My husband and I enjoyed watching the videos on the Dinosaurs. I loved the craft side of it. Using recycled products is amazing. I must send this link to my grandchildren.
Hi Yvonne, great! glad you like my post. This is my intention to re-use throw-outs,
there is so much wastage these days, we can recycle almost anything, just need to get your
creative head out!
Please do get your grandchildren to take a look and have a go. I also have many more
craft projects your grandchildren could endulge in.
My previous post is on ‘Recycled Robot for kids’ they may enjoy that one too!
Thanks for dropping by 🙂
Hi Julia,
Wow This is something Really cool. Customized Dinosaur bottle is so cue and realistic. All the steps explained by you is so crisp and neat.
My sone and I am definitely going to try this out at home as now we are all locked up in our homes and during this time these types of activities would be real fun.
The way you explained and the creativity that you put in making this bottle is so amazing. I would love to see many more such things on this page. I really liked each and every detail.
I am surely going to try this out and even share it with people so that they could also spend some quality time with their kids performing this activity.
Nice!
Cheers!
Hi Samantha, so glad you liked this activity and would be taking it on to try with your son!
You wouldn’t believe something like a plastic milk bottle could be changed into a dinosaurs head!
When done it does look spectacular and it’s great to hear that you can follow my examples!
I have also made an indian elephant in a previous post using a milk bottle. Please do check out previous posts.
My aim is to recycle throw-outs and make something crafty with them.
Love to see what you and your son create, send me some pictures and and I can add it as an update!
I am also happy that you want to share this activity, so that others can have fun with their kids too!
Happy crafting and thanks for the feedback 🙂


A custom milk dinosaur bottle. Quite creative.
Thanks for this lovely guide, as you gave me an idea for the perfect dad/son activity for this week. My five-year-old will love to craft this for his younger sis, and it’s you he should be thanking.
The site’s name suits it well. You’ve just gained a new follower. Keep it up, and I hope to see another DFY project like this one really soon.
Gorjan,
Hi Gorjan, brilliant! glad you enjoyed the post and how to make a crazy dinosaurs head!
Kids get such a kick out of making anything that can flip, twist open and shut,
especially if it has a cool look too!
I would love to see your kids results, I could feature it as an update on my post and would
be great to see a convention of dinosaurs Roarrrrrr!!! lol
Brilliant! My husband and I enjoyed watching the videos on the Dinosaurs. I loved the craft side of it. Using recycled products is amazing. I must send this link to my grandchildren.
Hi Yvonne, great! glad you like my post. This is my intention to re-use throw-outs,
there is so much wastage these days, we can recycle almost anything, just need to get your
creative head out!
Please do get your grandchildren to take a look and have a go. I also have many more
craft projects your grandchildren could endulge in.
My previous post is on ‘Recycled Robot for kids’ they may enjoy that one too!
Thanks for dropping by 🙂
Hi Julia,
Wow This is something Really cool. Customized Dinosaur bottle is so cue and realistic. All the steps explained by you is so crisp and neat.
My sone and I am definitely going to try this out at home as now we are all locked up in our homes and during this time these types of activities would be real fun.
The way you explained and the creativity that you put in making this bottle is so amazing. I would love to see many more such things on this page. I really liked each and every detail.
I am surely going to try this out and even share it with people so that they could also spend some quality time with their kids performing this activity.
Nice!
Cheers!
Hi Samantha, so glad you liked this activity and would be taking it on to try with your son!
You wouldn’t believe something like a plastic milk bottle could be changed into a dinosaurs head!
When done it does look spectacular and it’s great to hear that you can follow my examples!
I have also made an indian elephant in a previous post using a milk bottle. Please do check out previous posts.
My aim is to recycle throw-outs and make something crafty with them.
Love to see what you and your son create, send me some pictures and and I can add it as an update!
I am also happy that you want to share this activity, so that others can have fun with their kids too!
Happy crafting and thanks for the feedback 🙂