Make kids reading much more fun, by saving their pages with a choice from seven textured DIY Halloween Bookmarks!
Keeping kids interested with DIY Halloween bookmarks!
It’s the Autumn season, school summer holidays are over, and kids are back at school and DIY Halloween Bookmarks would be ideal!
WHAT’S ROUND THE CORNER?
It will be the lead-up to Halloween, where kids just love to fool around, dressing up in cute but scary costumes and doing spooky fun things. (later on, look out for Halloween costumes!)
COMING UP!
So later in this post, I shall show you keeping in with the spooky theme, how to make seven DIY Halloween Bookmarks, using some recycling and easy resources you have to hand!
HALLOWEEN FUN!
What’s included are Pumpkin picking, Pumpkin carving competitions, and not forgetting the Ghouls, Monsters, Witches, Vampires, and Spiders!
Oh yes, I don’t think I’ve forgotten anything but you know what I mean!
It’s the kind of thing that will be displayed within our supermarkets preparing kids for the Halloween events!
NOT A SCHOOL THING!
The concept of Halloween is not taught at our schools, although some elements may be spoken about.
KIDS LOOKING FORWARD TO IT!
Kids will pick up on, Witchcraft, Vampires, and Monsters through other means, on our TVs, or within our Supermarkets, and themes for kids’ parties, and simply they just know it’s that time of the year.
PREPARING FOR THIS EVENT!
This would also be just before the lead-up to Bonfire night on the 5th of November, where kids would dress in their Halloween costumes for trick or treating!
BACK TO STUDYING!
A DIY Halloween bookmark, would come in handy here.
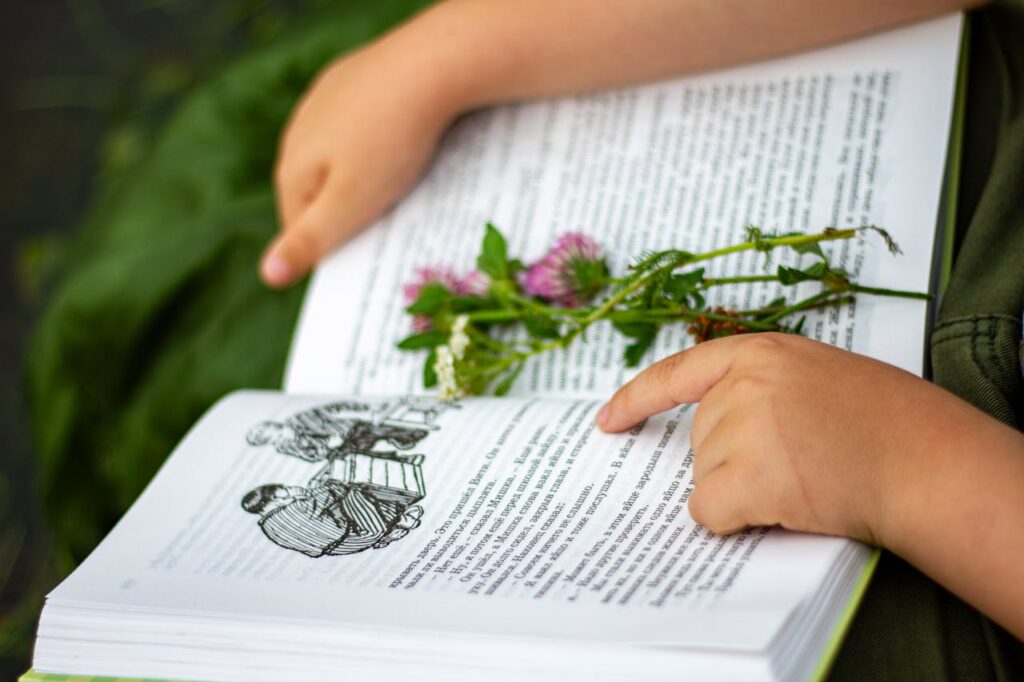
Coming back to kids going back to school, one of the important aspects of our kid’s learning is to familiarize themselves with good old-fashioned reading!
GREAT TO READ!
Picking up a book is pretty straightforward for kids, they see, they like they explore and they read!
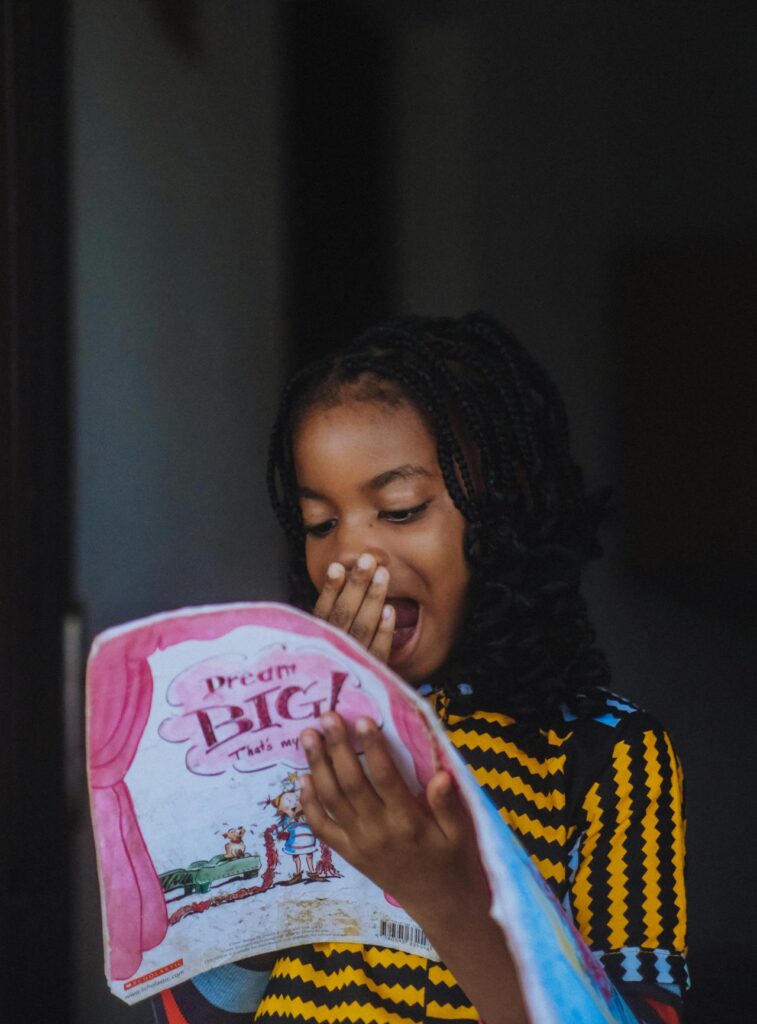
They would follow a story through and there is nothing better than that feeling, to complete a story with that final Aah moment, and find out how the story ends.
Girl surprised how the story ends. A Pexels picture by wavy revolution.
CHECKING LAST PAGE!
Obviously, from start to finish and the bits in between, your kids will have breaks, so they would have to mark that page, right?
MARKING THAT PAGE!
So how would kids mark that page? Well, there are those who would, bend the corner of a page to mark it, better known as ‘Dog Earing’, but doing this throughout the book is damaging the pages!
PEN MARK!
Some would pen mark the page and scribble a mark on the page!
Again that’s not a good idea as passing on the book to someone else, really is not a good look with any kind of crease mark, as it would be regarded as worn or defective.
BETTER OPTION!
Putting all that aside, the most kindest and sensible option is to put a bookmark as a placeholder within that page!
MY INTENTION!
One of the aspects of children’s learning is for them to get back into familiarizing themselves with good old-fashioned reading!
And to go with reading books, I thought it would be a good idea to craft some bookmarks,andas it’s nearly Halloween, we can make some spooky ‘DIY Halloween bookmarks!’
A BIT DIFFERENT!
But not just any bookmarkers, my take on these will be textured bookmarkers, and I will show seven easy ideas to craft, but you can just choose your favourite one!
BEING CURIOUS!
I always like to delve a bit deeper and find out more about certain subjects, and I found this interesting information from a Samuel Johnson Museum, aboutbookmarks, past and present.
HERE’S A LITTLE TREAT!
Before we start here is a little taster on a Monster theme. Take a look, at this video. This cartoon back in the day was quite popular! I thought it might also inspire you, or just simply get you into the Halloweeny mood!
SHALL WE START?
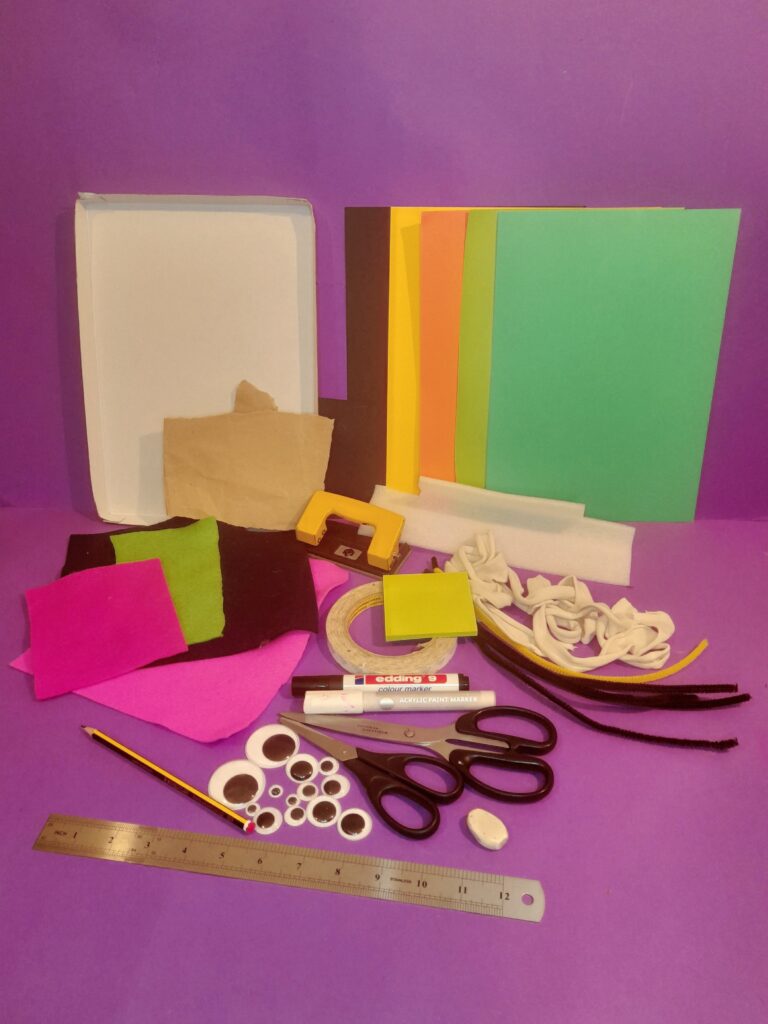
All resources you will need to craft DIY Halloween Bookmarks!
RESOURCES!
A4 Black card.
Packaging card/paper.
Coloured paper stock.
Coloured felt fabrics.
4 black pipe cleaners.
Hole punch.
Double-sided tape.
Scissors large and small.
Black felt tip/White acrylic pen.
A range of googly eyes.
Pencil/Ruler/Rubber.
Polystyrene wrap.
Bright coloured post-its.
Ripped white t/shirt for a cord.
These are all the resources that you will need to make all the bookmarks, but if you choose just one to make, then see in the examples below, what stock you will need.
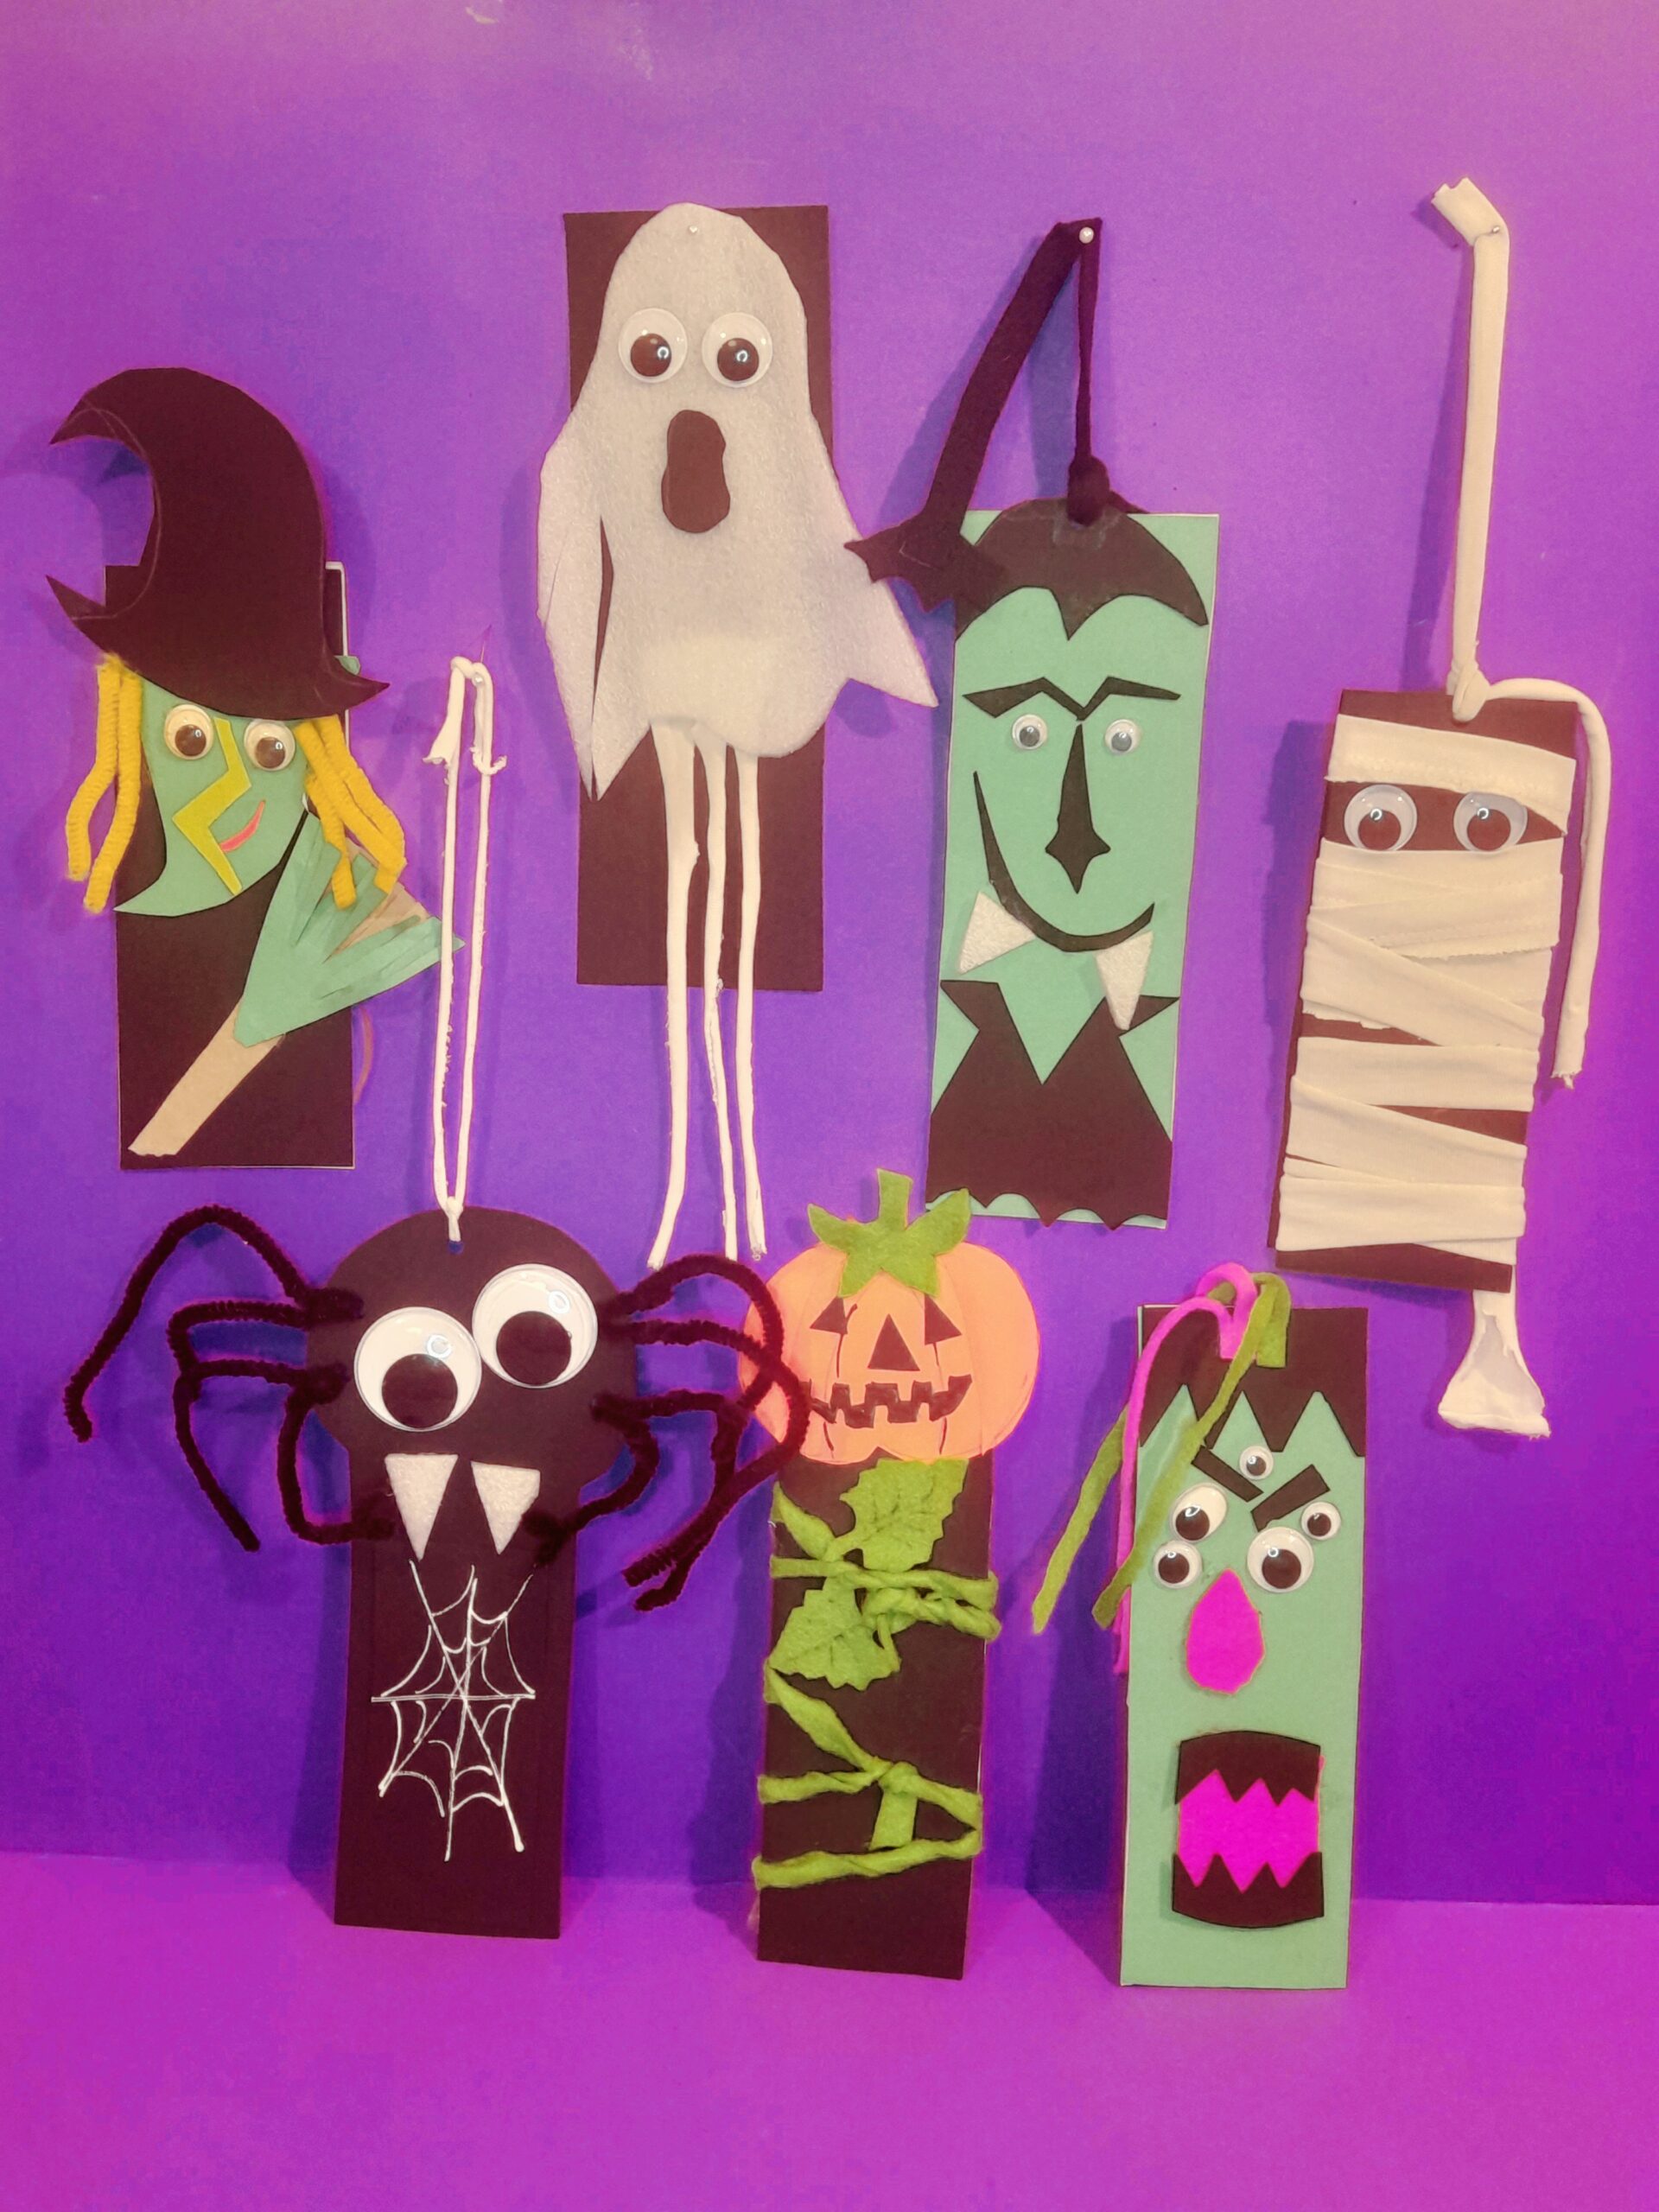
Here is a pick-and-mix selection of DIY Halloween bookmarks from which you can choose. So take your pick!
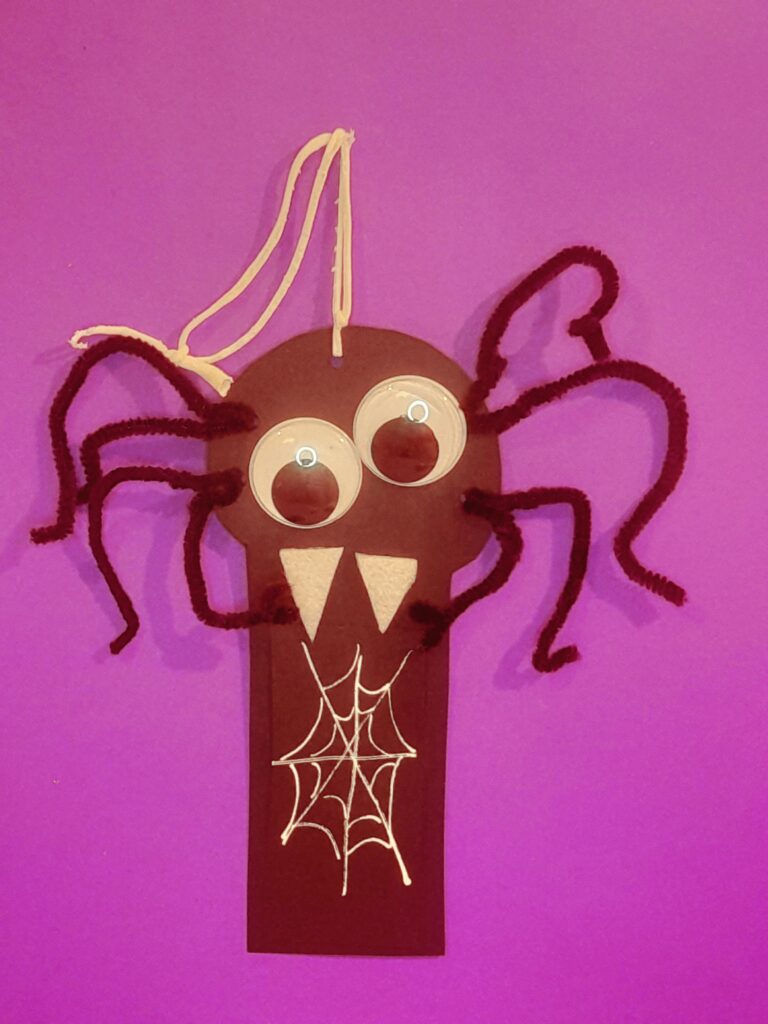
SPIDER BOOKMARK!
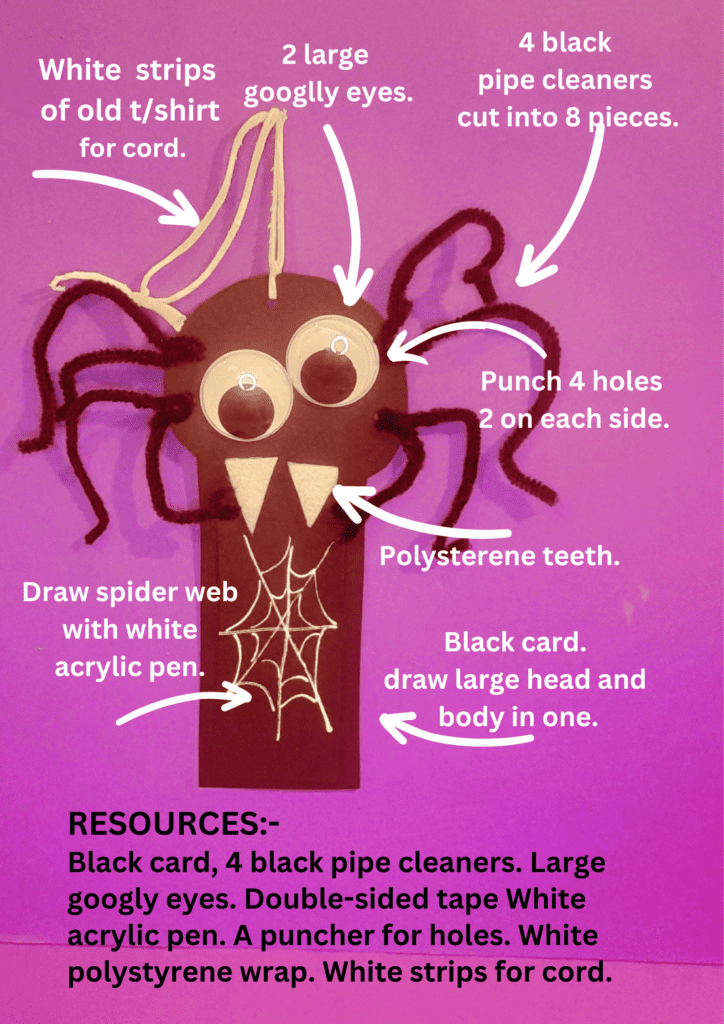
Resources and how to make a DIY Halloween Bookmark Spider!
Here is the finished Spider Bookmark.
MAIN BODY.
From an A4 black card measuring 23 x 7 cm, draw a round head 10 cm wide as shown at the top. So all in one piece.
FOR LEGS.
Punch 2 holes on either side of the head and cut pipe cleaners in half, thread 2 in each hole. Now bend the legs.
GOOGLY EYES.
Add googly eyes position as shown, leaving space for teeth. Stick double-sided tape.
TEETH.
Cut out 2 pointed teeth from poly. foam wrap. Stick on with double-sided tape.
SPIDER WEB.
Draw a spider web with a white acrylic pen. 4 lines crossing each other, and draw curves to fill gaps.
TO HANG AS PROP.
Punch a hole at the top of the head, thread a long white strand of cloth through the hole, and tie. This symbolizes a cobweb.
NEXT IS THE MUMMY!
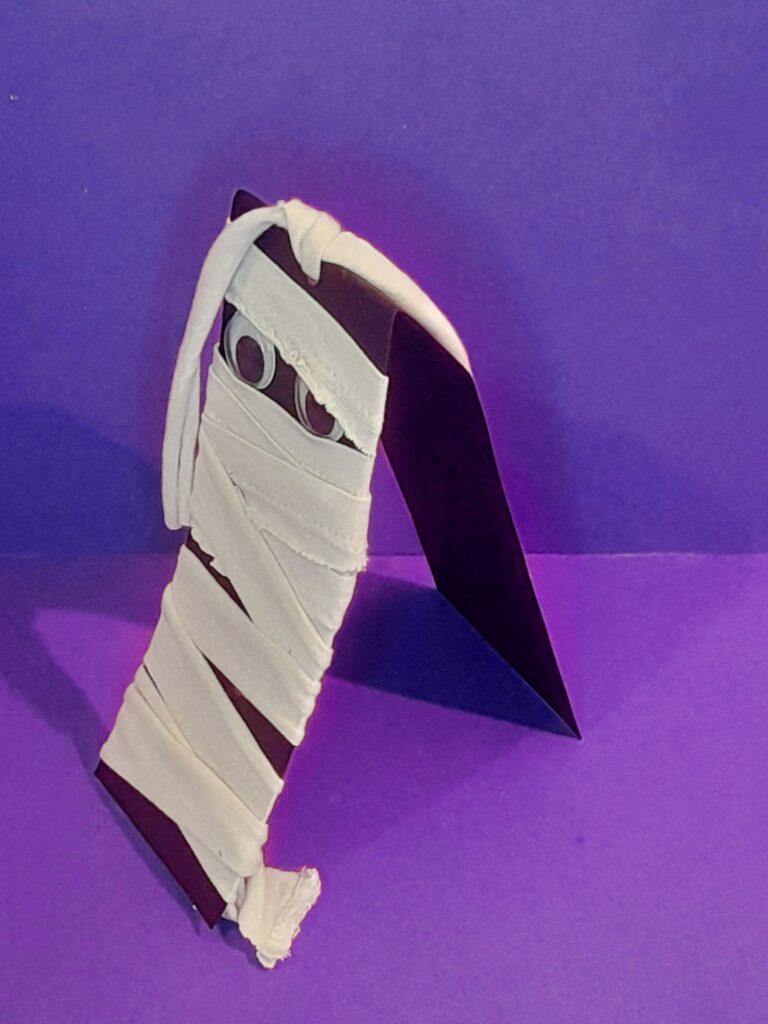
Resources and how to make a DIY Halloween Bookmark Mummy!
Here is a side view, front and back.
THE WHOLE BODY.
Grab a sheet of black card Approx A4 and measure a length of 35 x 7 cm. Cut using your scissors to size.
TO DRESS.
With one long strip of white cotton, from a cut t/shirt wrap it around the card as shown and tie it at the end.
GOOGLY EYES.
Take 2 googly eyes make a gap in the wrap and stick with double-sided tape onto the card.
CORD AT THE TOP.
Punch a hole at the top of the card and thread a long strand of white material through it, tie it up. This symbolizes a bandage.
As this bookmark is folded in half, you can slide it over a page, as two parts.
THE GHOST BOOKMARK!
Resources and how to make a DIY Halloween Bookmark Mummy!what you need and how to make.
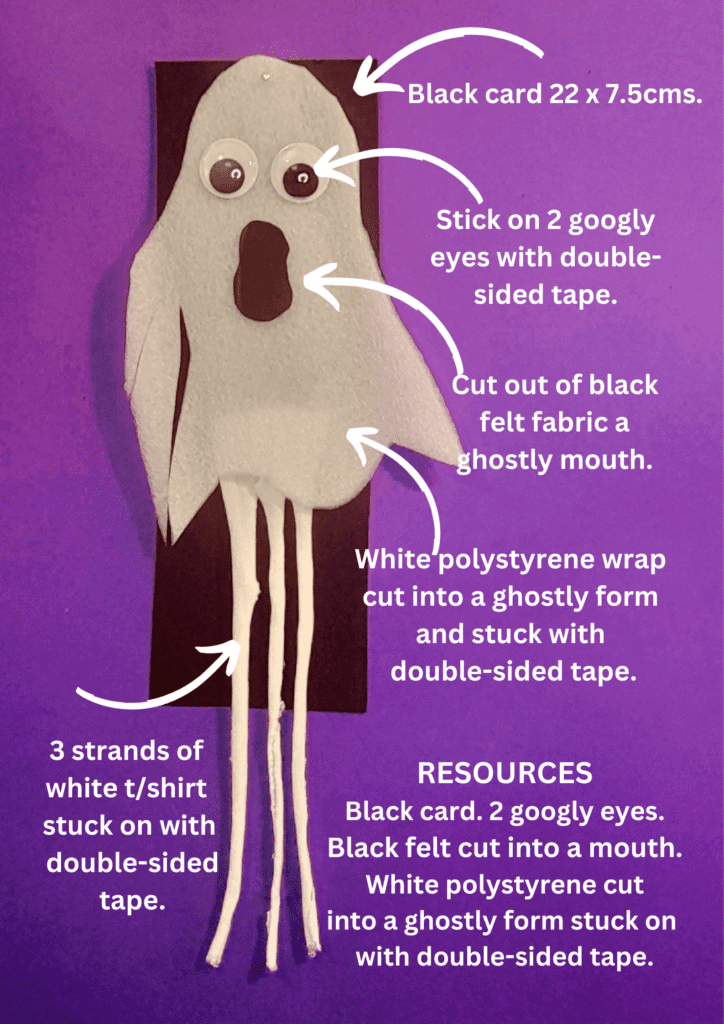
MAIN BODY.
A black card will be the backing for the ghost. Stick onto packaging card for stability, cut to size 22 x 7.5 cm.
GHOSTLY FORM.
Cut out the ghost from polystyrene foam wrap and stick it onto a black card with double-sided tape. Stick 3 white fabric strands on the underside of the ghostly figure with double-sided tape.
FEATURES.
Stick on googly eyes. Cut out from black felt fabric a long ghostly mouth and stick on with double-sided tape.
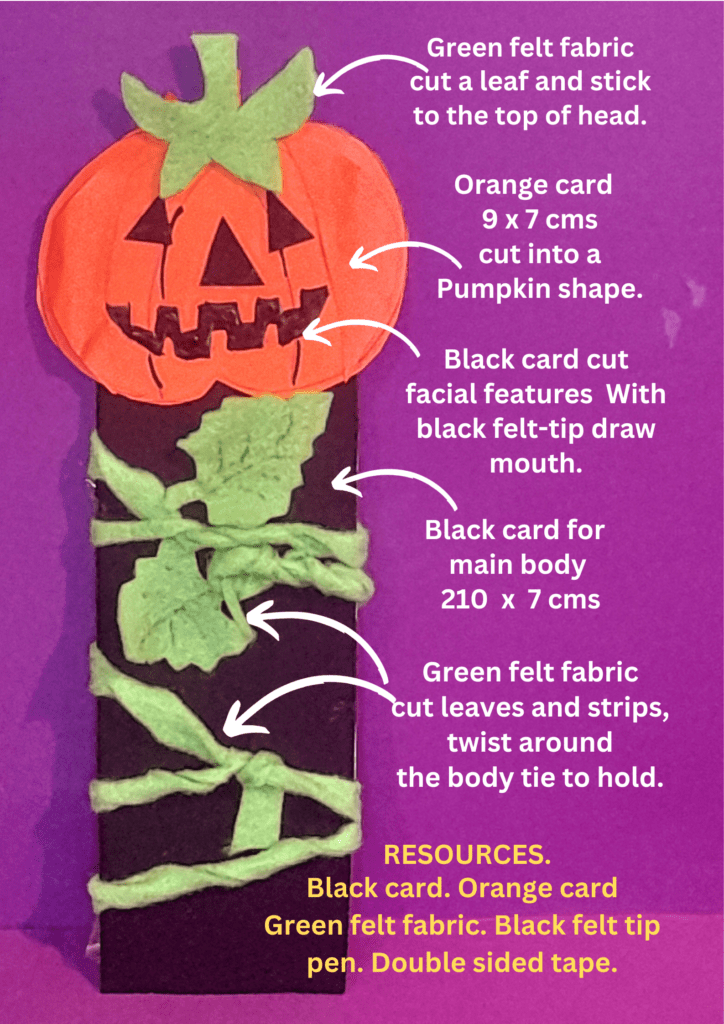
A PUMPKIN BOOKMARK!
Resouces and how to make a DIY Halloween Bookmark Pumpkin!
MAIN BODY.
Use black card cut and stick onto packaging card for stability, and measure 9 x 7 cm.
FOR HEAD.
From an orange card draw a Pumpkinhead cut out and stick it onto the card at the top end, and add black features from a black card and draw the mouth with a black felt-tip pen.
FOR VINE.
Use green felt fabric and cut leaves and twist the rest around the body of the card and tie to hold firmly.
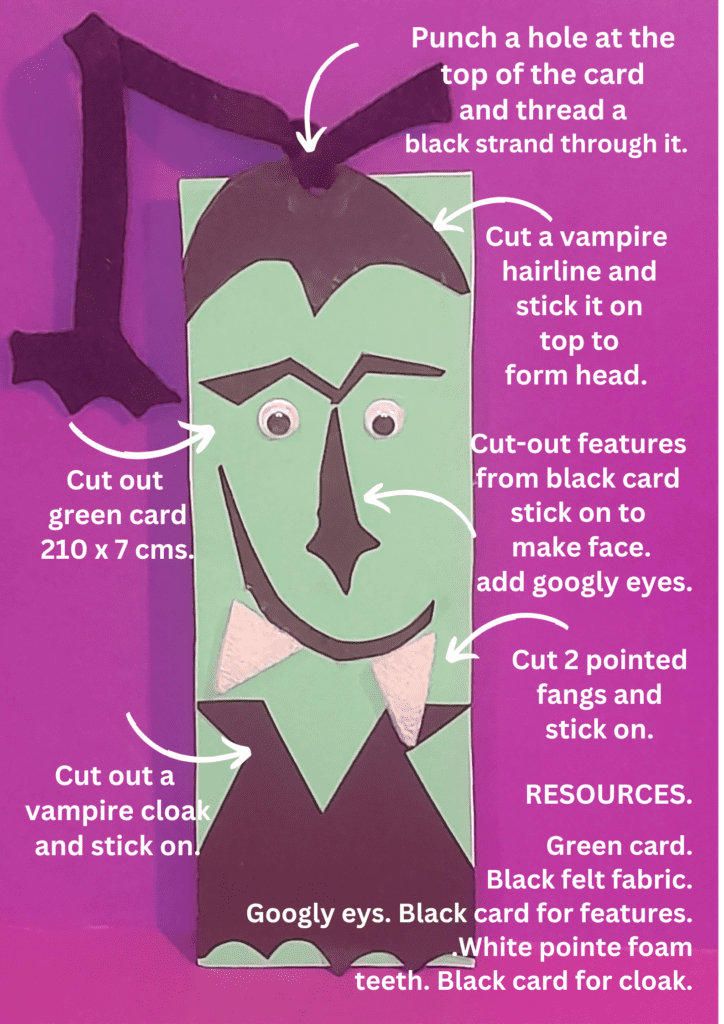
VAMPIRE BOOKMARK.
Resources and how to make a DIY Halloween Bookmark Vampire!
MAIN BODY.
Cut green card to size. 210 x 7 cms.
ALL PARTS.
With a black card cut out all facial features, a pointed hairline, and a vampire cloak.
EYES AND TEETH.
Stick on googly eyes and pointed foam teeth using double-sided tape.
CORD TO HANG.
Cut a long strand from black felt fabric, punch a hole on top of the bookmark, and thread through. Cut out a bat to stick on the end.
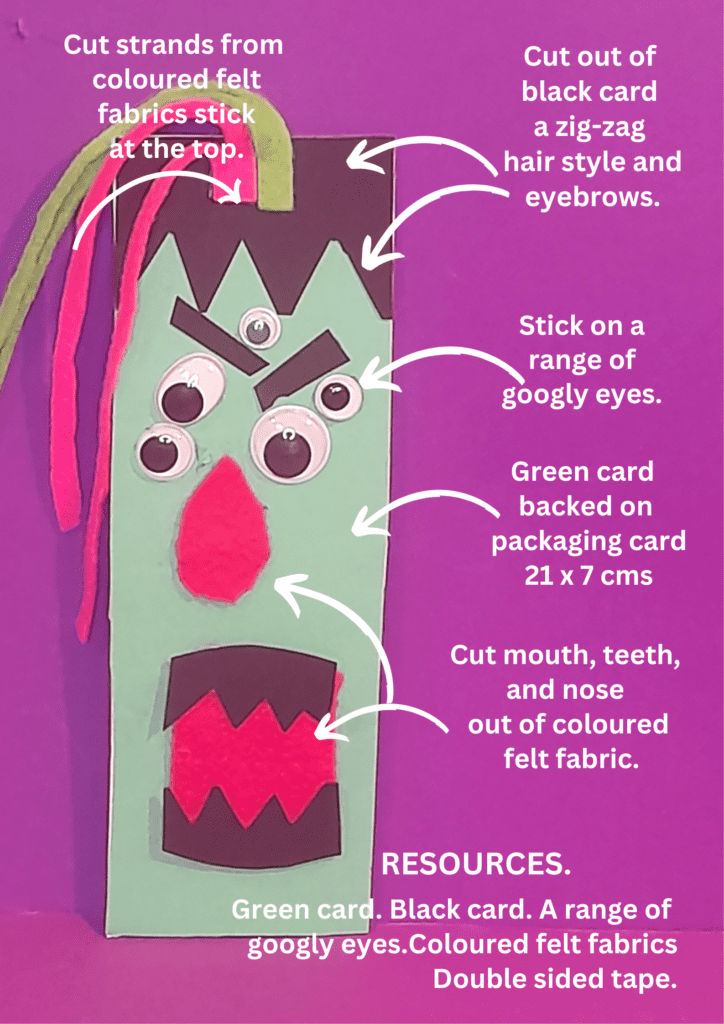
A MONSTER BOOKMARK.
Resources and how to make a DIY Halloween Bookmark Monster!
MAIN BODY.
Cut green card and back on packaging card. 21 x 7 cms.
ALL OR ANY.
Cut out of black card or felt fabric, the hair, eyebrows, and jagged teeth.
The nose and inside of the mouth are cut from coloured felt fabric or card.
HAIR STRANDS.
Cut coloured strands of hair and stick them on with double-sided tape.
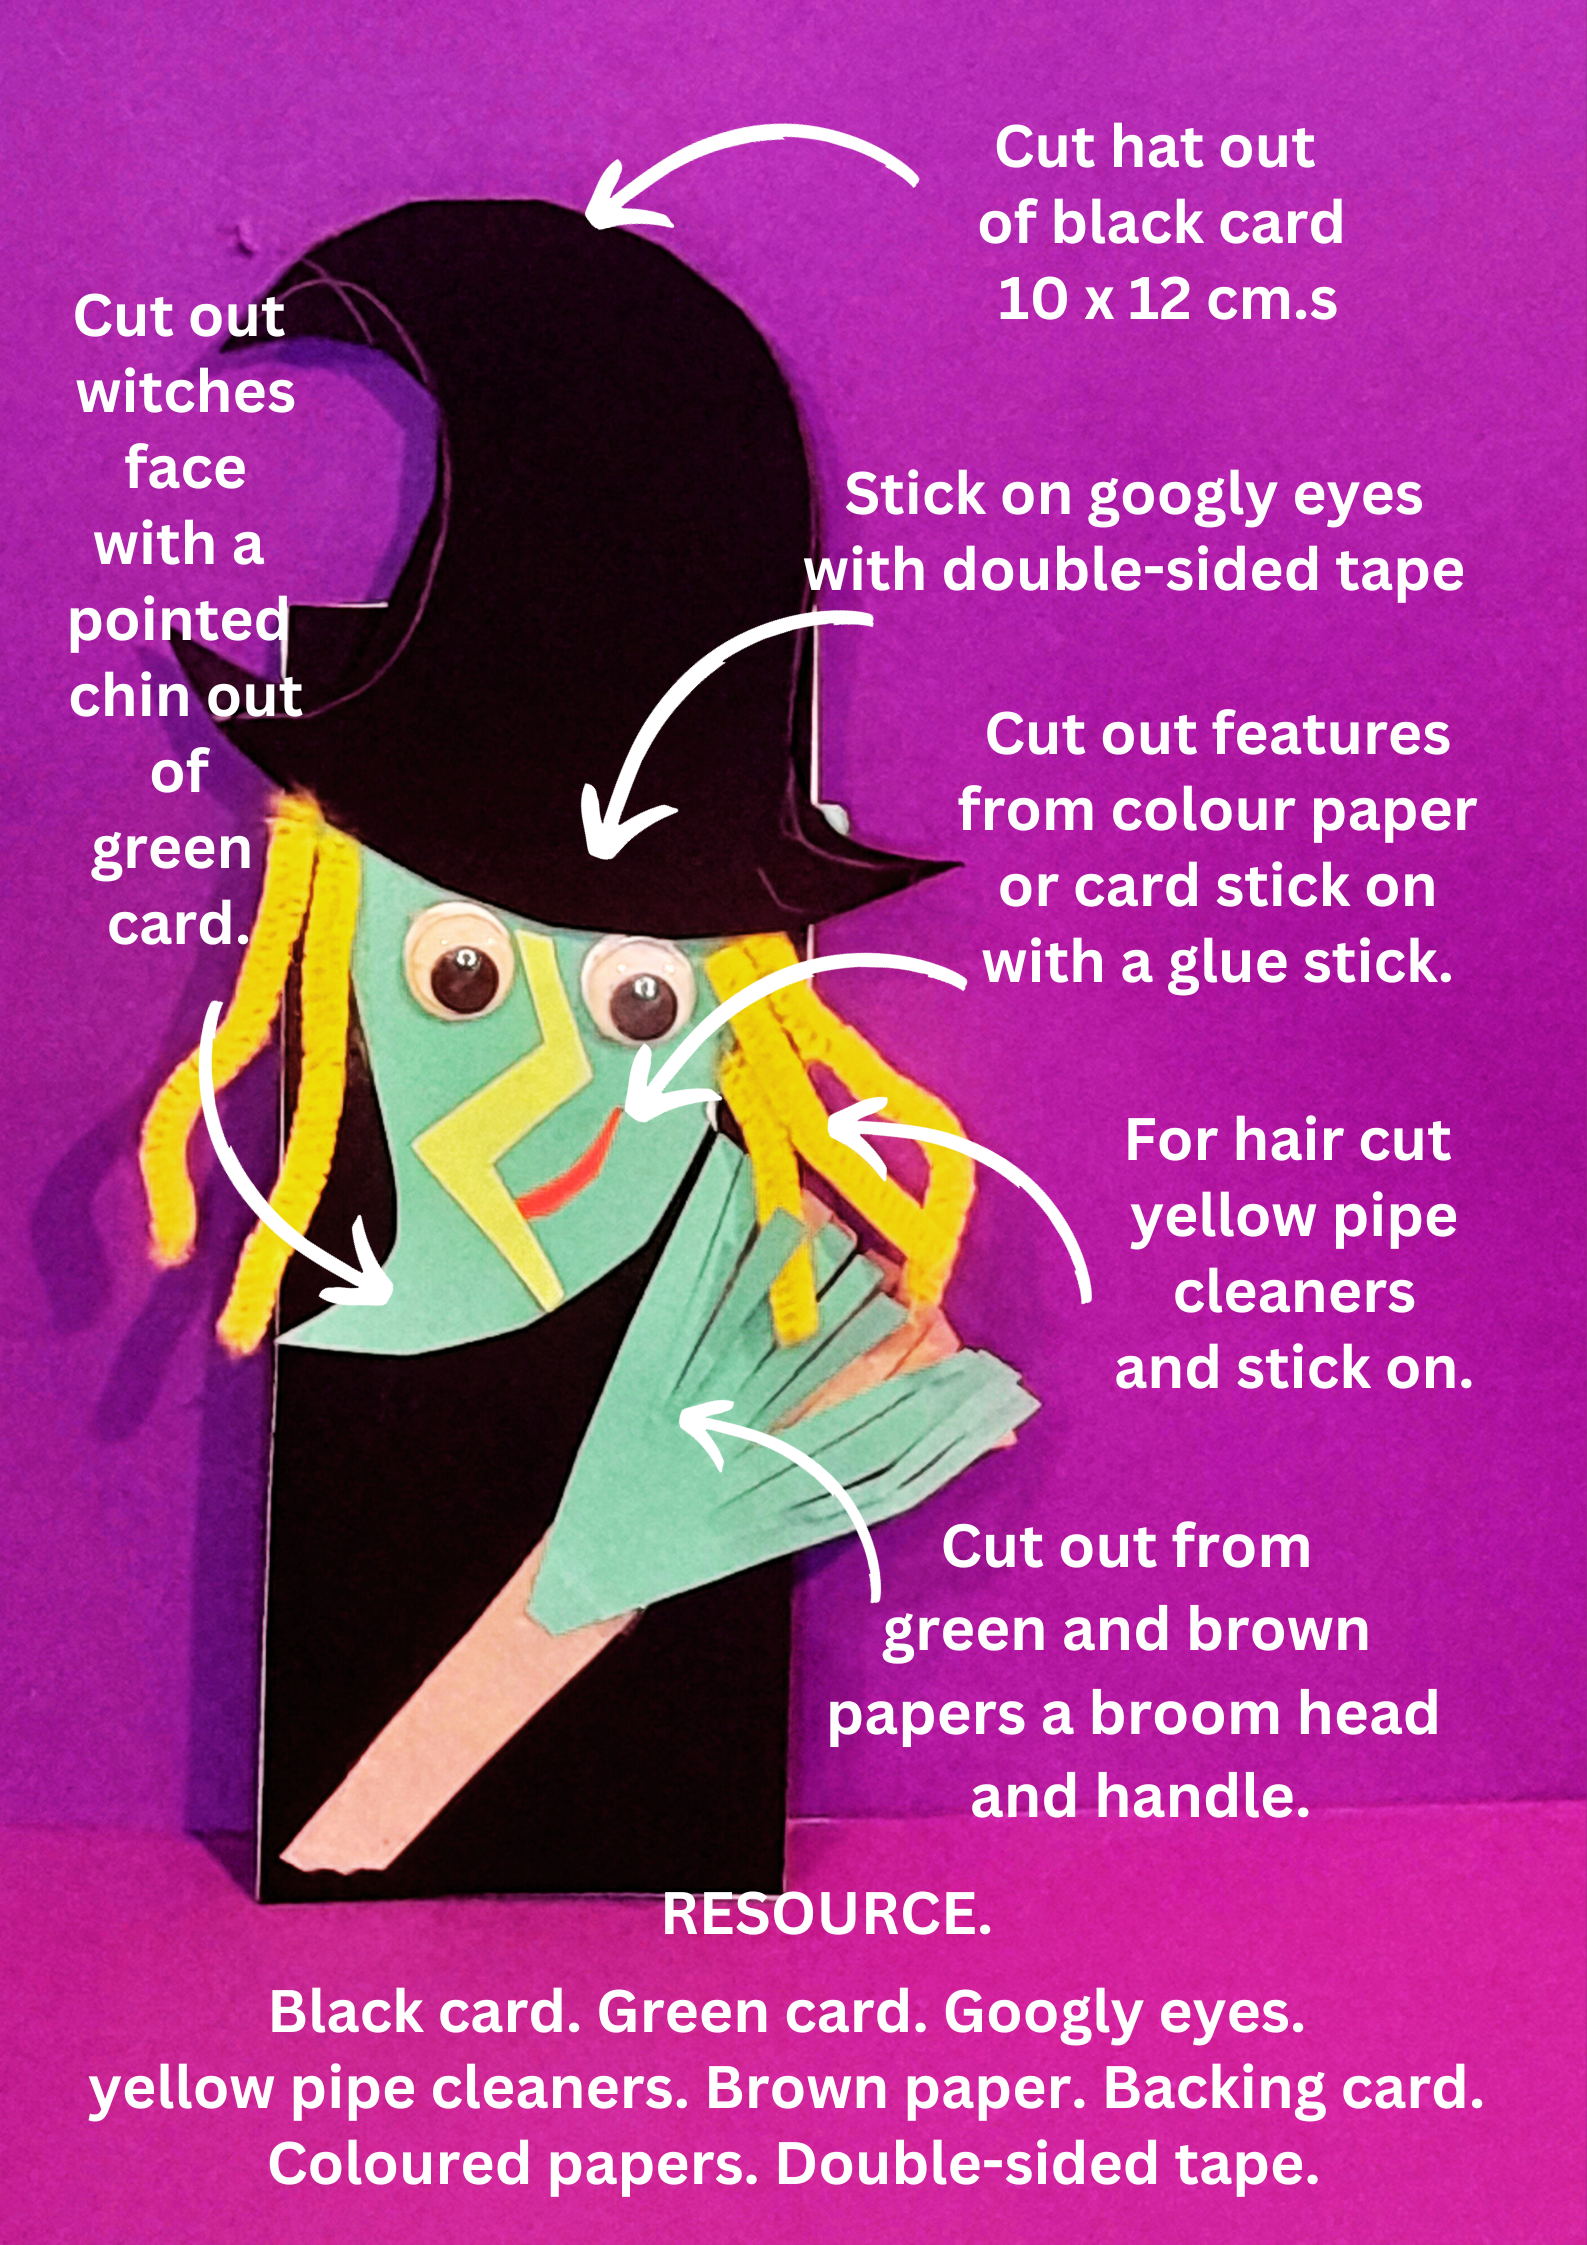
WITCH BOOKMARK.
Resources and how to make a DIY Halloween Bookmark Witch!
MAIN BODY.
Cut out of black card 18.5 x 7.5 cm and back it up with packaging card.
HAT AND GOOGLY EYE.
Draw a Witches hat similar to the one shown, 10 x 12 cm widest part is the rim. Stick about 4 cm down from the top of the main card, then add googly eyes.
FEATURES.
Cut out Witches face out of a green card and add features cut from coloured papers.
BENDY HAIR.
Cut and stick yellow pipe cleaners on either side of the hat, and bend into shape.
BROOM.
Cut broom out of green and brown card and paper, and stick on with double-sided tape.
SOME TIPS!
STICKING ON
All the sticking is done with double-sided tape, apart from the smaller finer facial bits, then you can use a glue stick.
TO STRENGTHEN.
There are different colour card thicknesses, so to help strengthen them you can back up the bookmark with a packaging card, but a single card thickness may be enough.
RECYCLED MATERIALS.
I have included different types of recycled materials, that you can choose to use, or if you have alternatives that is fine too.
TEXTURE.
I wanted to give these cards a textured finish to them, slightly different from the ordinary bookmarks. Some materials can be a little bit thicker in parts, in which case you may not need to add a backing card, to the bookmark as this will give the card more depth.
MY IDEAS!
These are my interpretations of Halloween bookmarks, I just give you an idea, you can adapt or make your own version of any one of the characters shown.
When you click links in this post and make a purchase, I may earn a small commission at no extra cost to you. This helps support the craft projects shared on this website.😀